 线程池与Future
# 1 线程池的实现原理
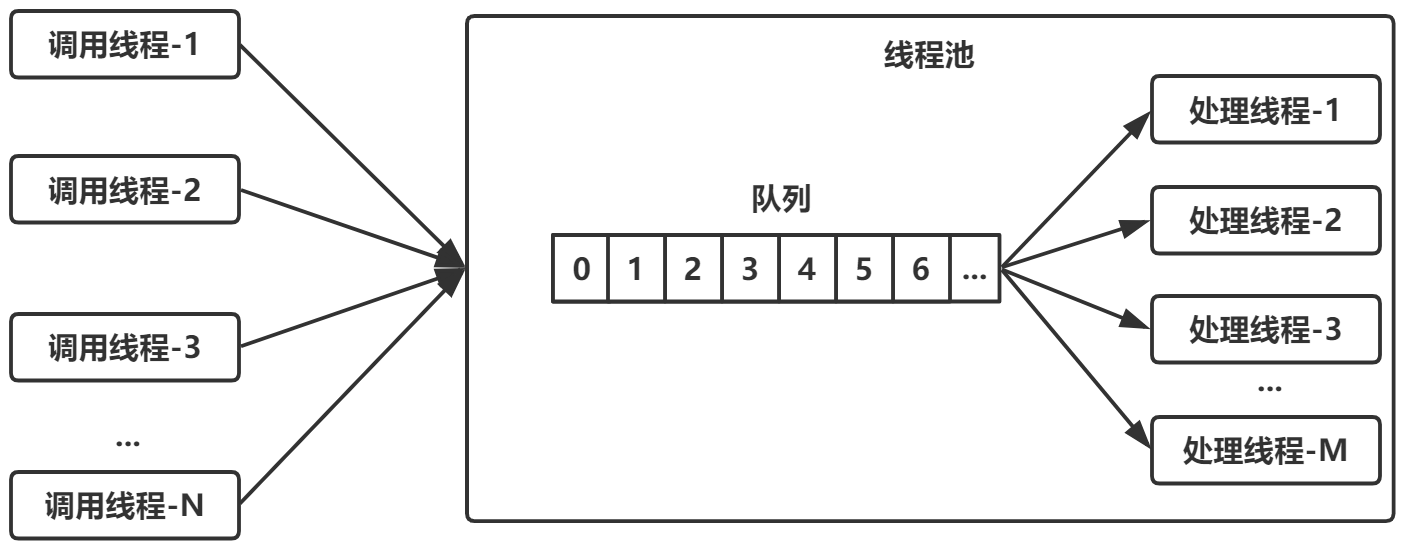
下图所示为线程池的实现原理:调用方不断地向线程池中提交任务;线程池中有一组线程,不断地从队列中取任务,这是一个典型的生产者—消费者模型。
要实现这样一个线程池,有几个问题需要考虑:
- 队列设置多长?如果是无界的,调用方不断地往队列中放任务,可能导致内存耗尽。如果是有界的,当队列满了之后,调用方如何处理?
- 线程池中的线程个数是固定的,还是动态变化的?
- 每次提交新任务,是放入队列?还是开新线程?
- 当没有任务的时候,线程是睡眠一小段时间?还是进入阻塞?如果进入阻塞,如何唤醒?针对问题4,有3种做法:
- 不使用阻塞队列,只使用一般的线程安全的队列,也无阻塞/唤醒机制。当队列为空时,线程池中的线程只能睡眠一会儿,然后醒来去看队列中有没有新任务到来,如此不断轮询。
- 不使用阻塞队列,但在队列外部、线程池内部实现了阻塞/唤醒机制。
- 使用阻塞队列。
很显然,做法3最完善,既避免了线程池内部自己实现阻塞/唤醒机制的麻烦,也避免了做法1的睡眠/轮询带来的资源消耗和延迟。正因为如此,接下来要讲的ThreadPoolExector/ScheduledThreadPoolExecutor都是基于阻塞队列来实现的,而不是一般的队列,至此,各式各样的阻塞队列就要派上用场了。
# 2 线程池的类继承体系
线程池的类继承体系如下图所示:
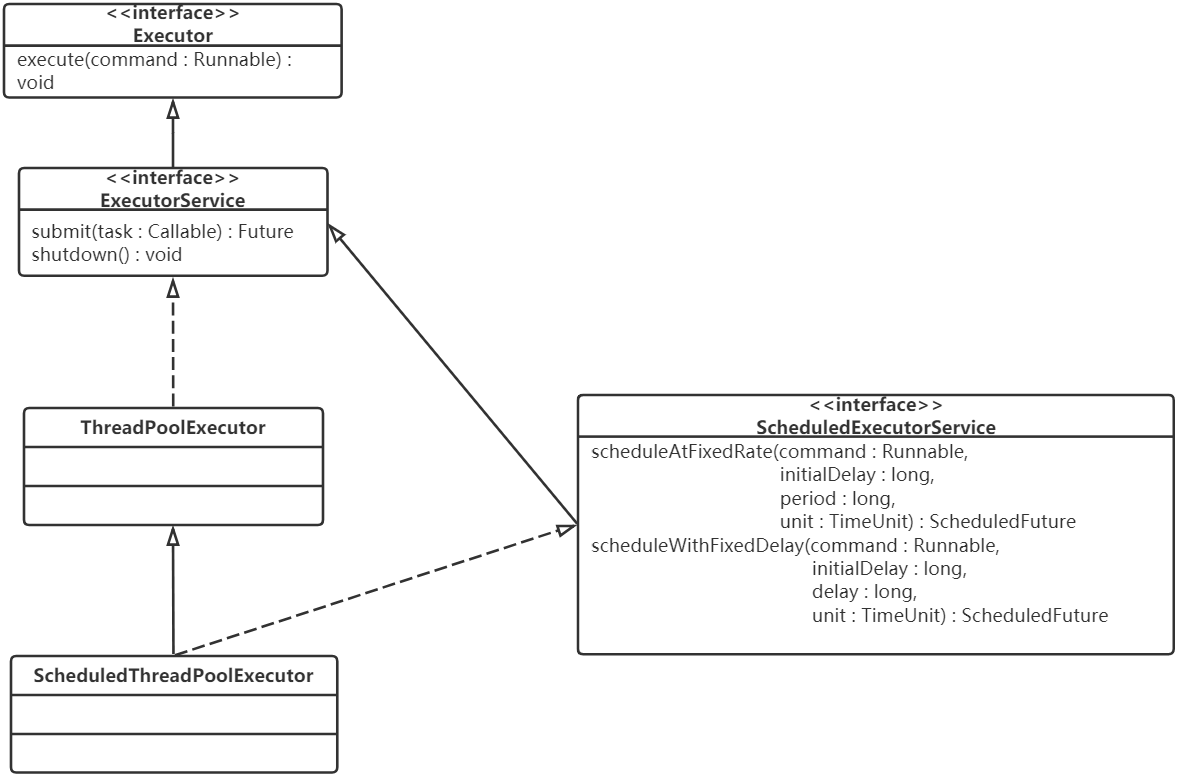
在这里,有两个核心的类: ThreadPoolExector 和 ScheduledThreadPoolExecutor ,后者不仅可以执行某个任务,还可以周期性地执行任务。
向线程池中提交的每个任务,都必须实现 Runnable 接口,通过最上面的 Executor 接口中的
execute(Runnable command) 向线程池提交任务。
然后,在 ExecutorService 中,定义了线程池的关闭接口 shutdown() ,还定义了可以有返回值的任务,也就是 Callable ,后面会详细介绍。
# 3 ThreadPoolExecutor
# 3.1 核心数据结构
基于线程池的实现原理,下面看一下ThreadPoolExector的核心数据结构。
public class ThreadPoolExecutor extends AbstractExecutorService {
  //...
  private final AtomicInteger ctl = new AtomicInteger(ctlOf(RUNNING, 0));
  // 存放任务的阻塞队列
  private final BlockingQueue<Runnable> workQueue;
  // 对线程池内部各种变量进行互斥访问控制
  private final ReentrantLock mainLock = new ReentrantLock();
  // 线程集合
  private final HashSet<Worker> workers = new HashSet<Worker>();
  //...
}
2
3
4
5
6
7
8
9
10
11
每一个线程是一个Worker对象。Worker是ThreadPoolExector的内部类,核心数据结构如下:
private final class Worker extends AbstractQueuedSynchronizer implements
Runnable {
  // ...
  final Thread thread; // Worker封装的线程
  Runnable firstTask; // Worker接收到的第1个任务
  volatile long completedTasks; // Worker执行完毕的任务个数
  // ...
}
2
3
4
5
6
7
8
由定义会发现,Worker继承于AQS,也就是说Worker本身就是一把锁。这把锁有什么用处呢?用于线程池的关闭、线程执行任务的过程中。
# 3.2 核心配置参数解释
ThreadPoolExecutor在其构造方法中提供了几个核心配置参数,来配置不同策略的线程池。
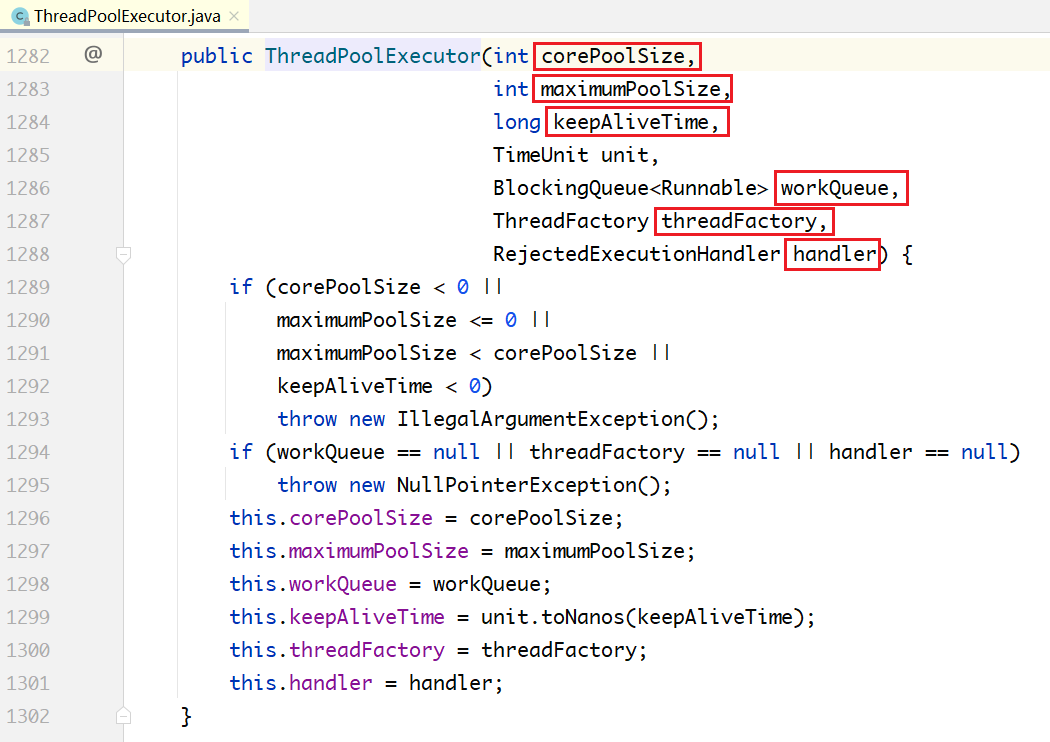
上面的各个参数,解释如下:
- corePoolSize:在线程池中始终维护的线程个数。
- maxPoolSize:在corePooSize已满、队列也满的情况下,扩充线程至此值。
- keepAliveTime/TimeUnit:maxPoolSize 中的空闲线程,销毁所需要的时间,总线程数收缩回corePoolSize。
- blockingQueue:线程池所用的队列类型。
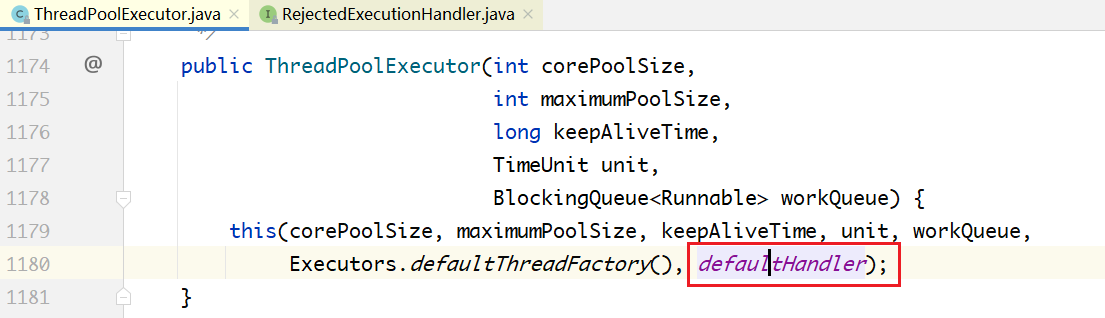
- threadFactory:线程创建工厂,可以自定义,有默认值Executors.defaultThreadFactory() 。
- RejectedExecutionHandler:corePoolSize已满,队列已满,maxPoolSize 已满,最后的拒绝策略。
下面来看这6个配置参数在任务的提交过程中是怎么运作的。在每次往线程池中提交任务的时候,有如下的处理流程:
步骤一:判断当前线程数是否大于或等于corePoolSize。如果小于,则新建线程执行;如果大于,则进入步骤二。
步骤二:判断队列是否已满。如未满,则放入;如已满,则进入步骤三。
步骤三:判断当前线程数是否大于或等于maxPoolSize。如果小于,则新建线程执行;如果大于,则进入步骤四。
步骤四:根据拒绝策略,拒绝任务。
总结一下:首先判断corePoolSize,其次判断blockingQueue是否已满,接着判断maxPoolSize,最后使用拒绝策略。
很显然,基于这种流程,如果队列是无界的,将永远没有机会走到步骤三,也即maxPoolSize没有使用,也一定不会走到步骤四。
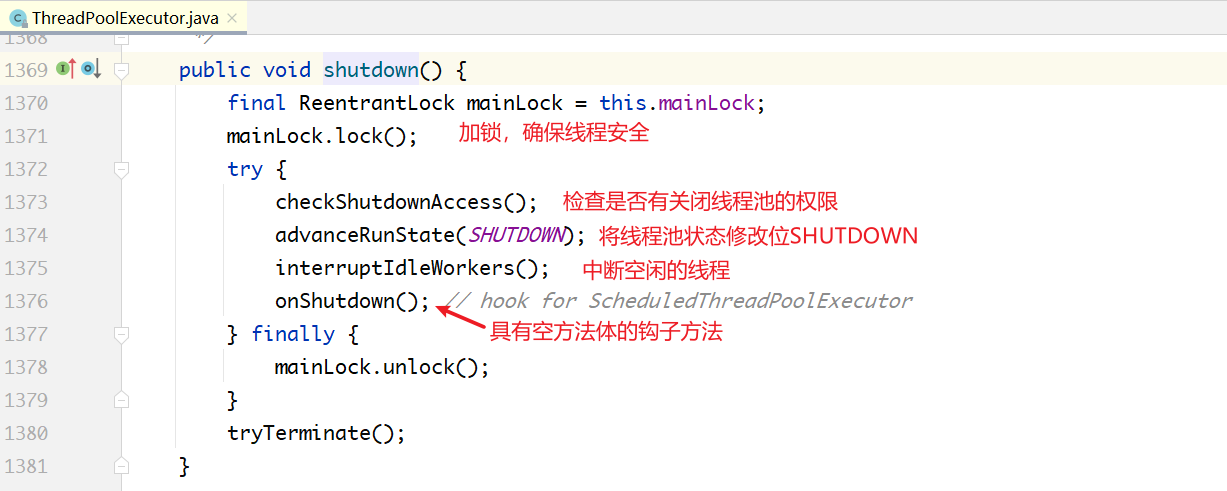
# 3.3 线程池的优雅关闭
线程池的关闭,较之线程的关闭更加复杂。当关闭一个线程池的时候,有的线程还正在执行某个任务,有的调用者正在向线程池提交任务,并且队列中可能还有未执行的任务。因此,关闭过程不可能是瞬时的,而是需要一个平滑的过渡,这就涉及线程池的完整生命周期管理。
# 1.线程池的生命周期
在JDK 7中,把线程数量(workerCount)和线程池状态(runState)这两个变量打包存储在一个字段里面,即ctl变量。如下图所示,最高的3位存储线程池状态,其余29位存储线程个数。而在JDK 6中,这两个变量是分开存储的。

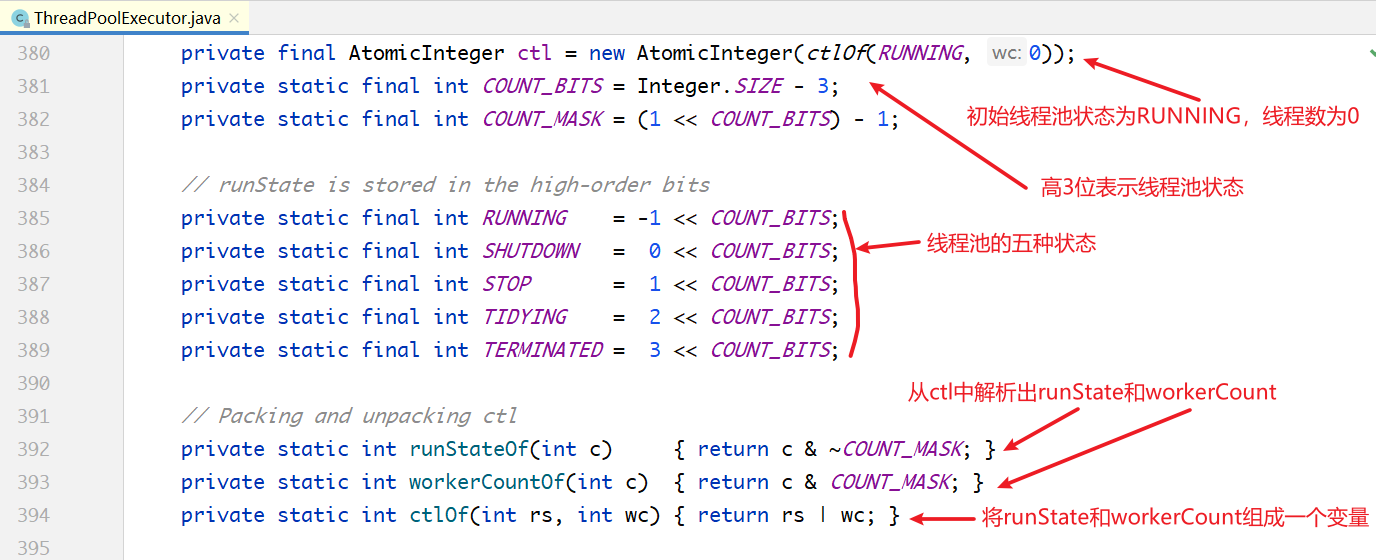
由上面的代码可以看到,ctl变量被拆成两半,最高的3位用来表示线程池的状态,低的29位表示线程的个数。线程池的状态有五种,分别是RUNNING、SHUTDOWN、STOP、TIDYING和
TERMINATED。
下面分析状态之间的迁移过程,如图所示:
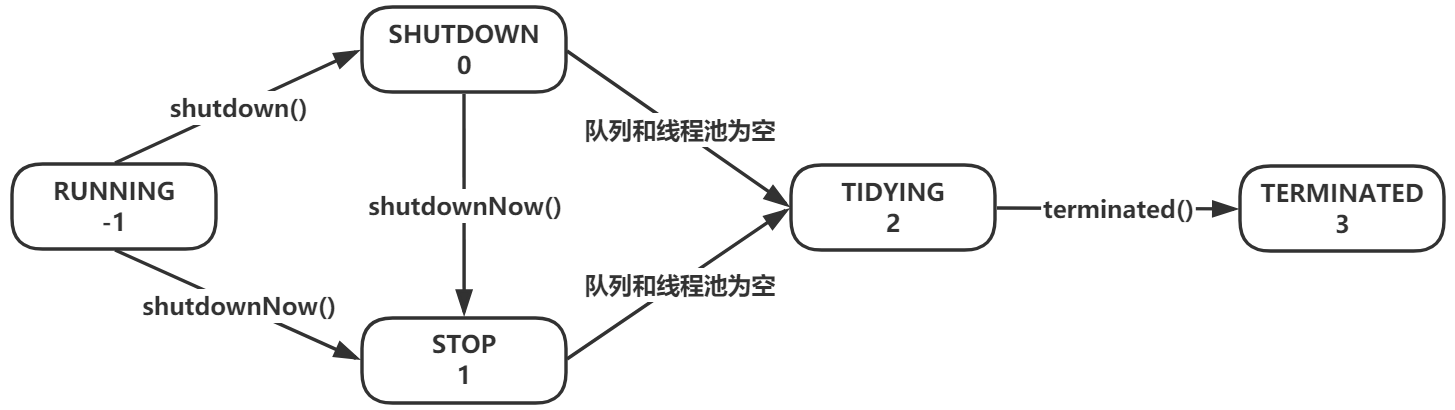
线程池有两个关闭方法,shutdown()和shutdownNow(),这两个方法会让线程池切换到不同的状态。在队列为空,线程池也为空之后,进入TIDYING 状态;最后执行一个钩子方法terminated(),进入TERMINATED状态,线程池才真正关闭。
这里的状态迁移有一个非常关键的特征:从小到大迁移,-1,0,1,2,3,只会从小的状态值往大的状态值迁移,不会逆向迁移。例如,当线程池的状态在TIDYING=2时,接下来只可能迁移到TERMINATED=3,不可能迁移回STOP=1或者其他状态。
除 terminated()之外,线程池还提供了其他几个钩子方法,这些方法的实现都是空的。如果想实现自己的线程池,可以重写这几个方法:
protected void beforeExecute(Thread t, Runnable r) { }
protected void afterExecute(Runnable r, Throwable t) { }
protected void terminated() { }
2
3
# 2.正确关闭线程池的步骤
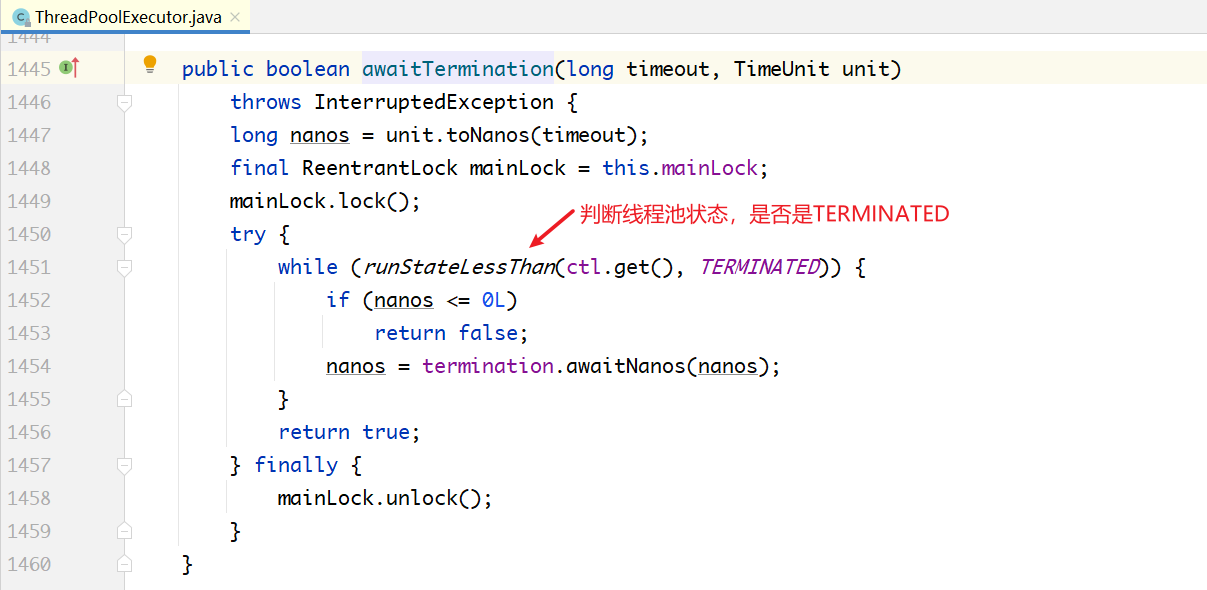
关闭线程池的过程为:在调用 shutdown()或者shutdownNow()之后,线程池并不会立即关闭,接下来需要调用 awaitTermination() 来等待线程池关闭。关闭线程池的正确步骤如下:
// executor.shutdownNow();
executor.shutdown();
try {
  boolean flag = true;
  do {
    flag = ! executor.awaitTermination(500, TimeUnit.MILLISECONDS);
 } while (flag);
} catch (InterruptedException e) {
  // ...
}
2
3
4
5
6
7
8
9
10
awaitTermination(...)方法的内部实现很简单,如下所示。不断循环判断线程池是否到达了最终状态TERMINATED,如果是,就返回;如果不是,则通过termination条件变量阻塞一段时间,之后继续判断。
# 3.shutdown()与shutdownNow()的区别
- shutdown()不会清空任务队列,会等所有任务执行完成,shutdownNow()清空任务队列。
- shutdown()只会中断空闲的线程,shutdownNow()会中断所有线程。

下面看一下在上面的代码里中断空闲线程和中断所有线程的区别。
shutdown()方法中的interruptIdleWorkers()方法的实现:
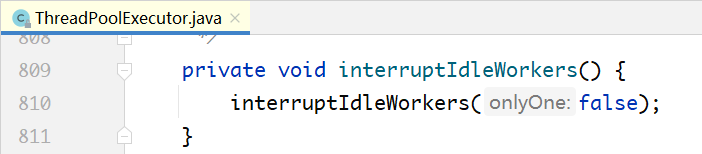
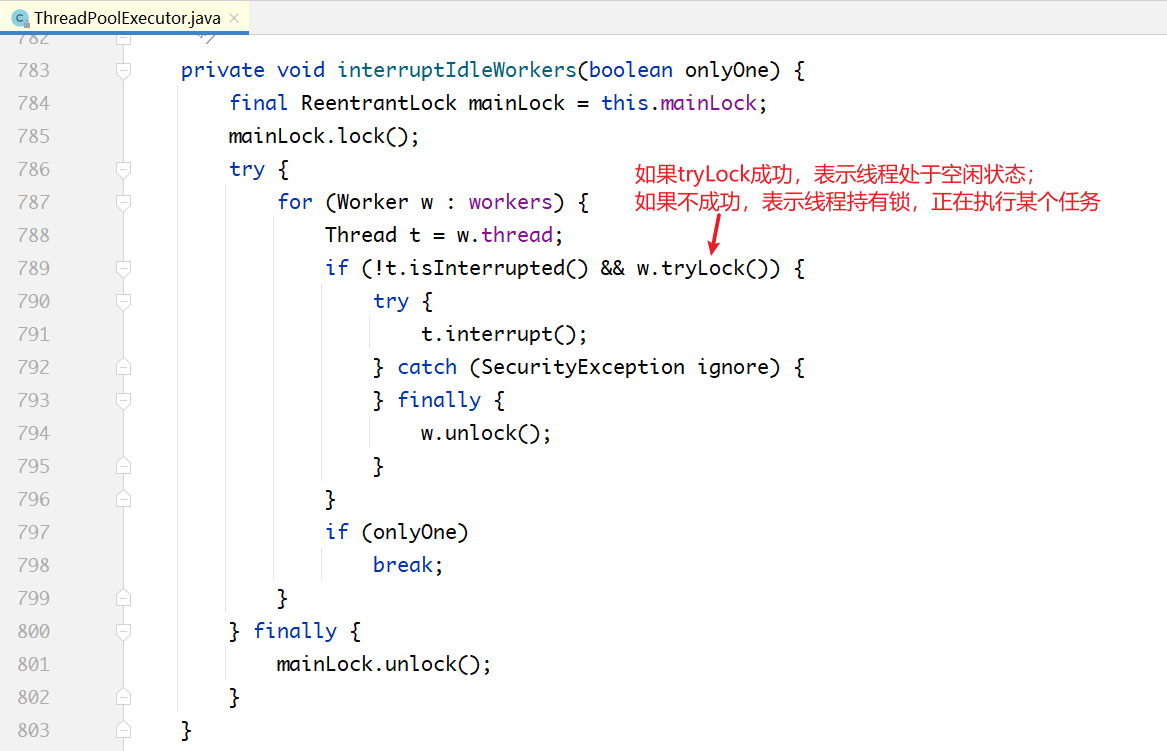
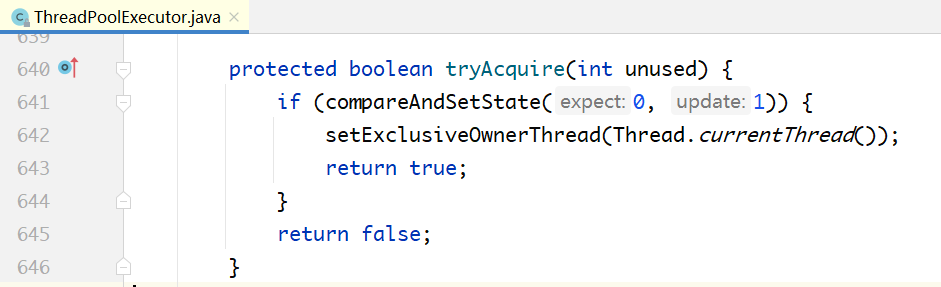
关键区别点在tryLock():一个线程在执行一个任务之前,会先加锁,这意味着通过是否持有锁,可以判断出线程是否处于空闲状态。tryLock()如果调用成功,说明线程处于空闲状态,向其发送中断信号;否则不发送。
tryLock()方法

shutdownNow()调用了 interruptWorkers(); 方法:
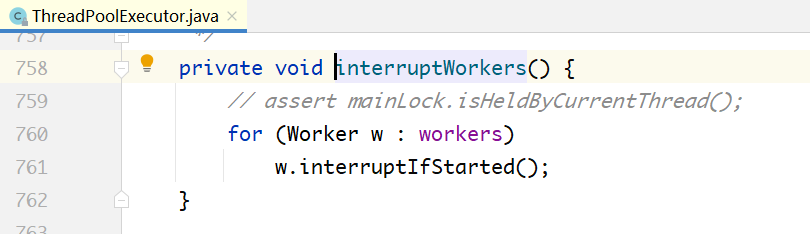
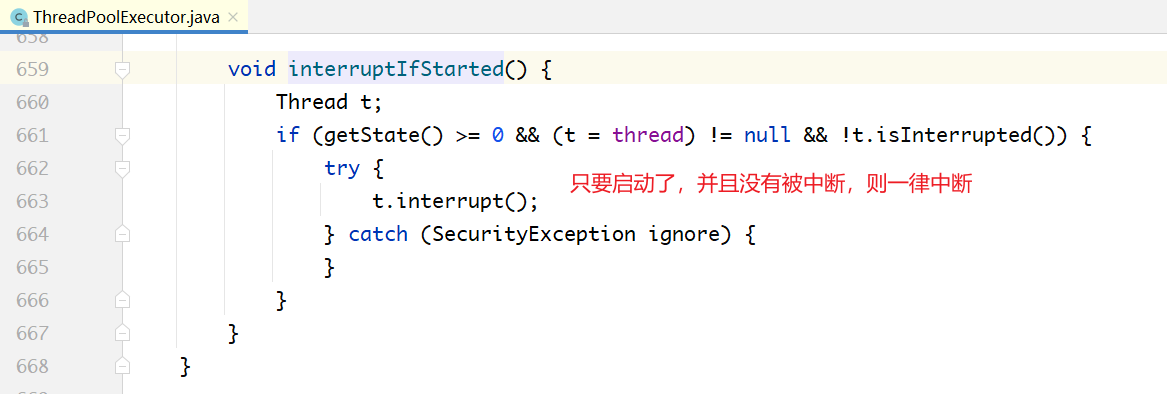
interruptIfStarted() 方法的实现:
在上面的代码中,shutdown() 和shutdownNow()都调用了tryTerminate()方法,如下所示:
final void tryTerminate() {
 for (;;) {
    int c = ctl.get();
    if (isRunning(c) || runStateAtLeast(c, TIDYING) ||
     (runStateLessThan(c, STOP) && ! workQueue.isEmpty()))
      return;
    if (workerCountOf(c) != 0) { // Eligible to terminate
      interruptIdleWorkers(ONLY_ONE);
      return;
   }
    // 当workQueue为空,wordCount为0时,执行下述代码。
    final ReentrantLock mainLock = this.mainLock;
    mainLock.lock();
    try {
      // 将状态切换到到TIDYING状态
      if (ctl.compareAndSet(c, ctlOf(TIDYING, 0))) {
        try {
          terminated(); // 调用钩子函数
       } finally {
          ctl.set(ctlOf(TERMINATED, 0)); // 将状态由TIDYING改为
TERMINATED
          termination.signalAll(); // 通知awaitTermination(...)
       }
        return;
     }
   } finally {
      mainLock.unlock();
   }
    // else retry on failed CAS
 }
}
2
3
4
5
6
7
8
9
10
11
12
13
14
15
16
17
18
19
20
21
22
23
24
25
26
27
28
29
30
31
tryTerminate()不会强行终止线程池,只是做了一下检测:当workerCount为0,workerQueue为空时,先把状态切换到TIDYING,然后调用钩子方法terminated()。当钩子方法执行完成时,把状态从TIDYING 改为 TERMINATED,接着调用termination.sinaglAll(),通知前面阻塞在awaitTermination的所有调用者线程。
所以,TIDYING和TREMINATED的区别是在二者之间执行了一个钩子方法terminated(),目前是一个空实现。
# 3.4 任务的提交过程分析
提交任务的方法如下:
public void execute(Runnable command) {
if (command == null)
throw new NullPointerException();
int c = ctl.get();
// 如果当前线程数小于corePoolSize,则启动新线程
if (workerCountOf(c) < corePoolSize) {
// 添加Worker,并将command设置为Worker线程的第一个任务开始执行。
if (addWorker(command, true))
return;
c = ctl.get();
}
// 如果当前的线程数大于或等于corePoolSize,则调用workQueue.offer放入队列
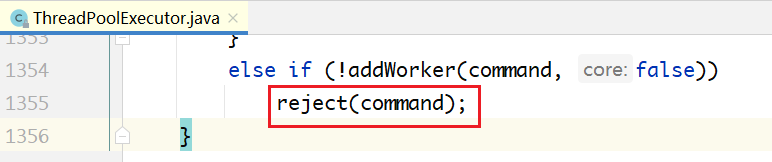
if (isRunning(c) && workQueue.offer(command)) {
int recheck = ctl.get();
// 如果线程池正在停止,则将command任务从队列移除,并拒绝command任务请求。
if (! isRunning(recheck) && remove(command))
reject(command);
// 放入队列中后发现没有线程执行任务,开启新线程
else if (workerCountOf(recheck) == 0)
addWorker(null, false);
}
// 线程数大于maxPoolSize,并且队列已满,调用拒绝策略
else if (!addWorker(command, false))
reject(command);
}
// 该方法用于启动新线程。如果第二个参数为true,则使用corePoolSize作为上限,否则使用
maxPoolSize作为上限。
private boolean addWorker(Runnable firstTask, boolean core) {
retry:
for (int c = ctl.get();;) {
// 如果线程池状态值起码是SHUTDOWN和STOP,或则第一个任务不是null,或者工作队列
为空
// 则添加worker失败,返回false
if (runStateAtLeast(c, SHUTDOWN)
&& (runStateAtLeast(c, STOP)
|| firstTask != null
|| workQueue.isEmpty()))
return false;
for (;;) {
// 工作线程数达到上限,要么是corePoolSize要么是maximumPoolSize,启动
线程失败
if (workerCountOf(c)
>= ((core ? corePoolSize : maximumPoolSize) & COUNT_MASK))
return false;
// 增加worker数量成功,返回到retry语句
if (compareAndIncrementWorkerCount(c))
break retry;
c = ctl.get(); // Re-read ctl
// 如果线程池运行状态起码是SHUTDOWN,则重试retry标签语句,CAS
if (runStateAtLeast(c, SHUTDOWN))
continue retry;
// else CAS failed due to workerCount change; retry inner loop
}
}
// worker数量加1成功后,接着运行:
boolean workerStarted = false;
boolean workerAdded = false;
Worker w = null;
try {
// 新建worker对象
w = new Worker(firstTask);
// 获取线程对象
final Thread t = w.thread;
if (t != null) {
final ReentrantLock mainLock = this.mainLock;
// 加锁
mainLock.lock();
try {
// Recheck while holding lock.
// Back out on ThreadFactory failure or if
// shut down before lock acquired.
int c = ctl.get();
if (isRunning(c) ||
(runStateLessThan(c, STOP) && firstTask == null)) {
// 由于线程已经在运行中,无法启动,抛异常
if (t.isAlive()) // precheck that t is startable
throw new IllegalThreadStateException();
// 将线程对应的worker加入worker集合
workers.add(w);
int s = workers.size();
if (s > largestPoolSize)
largestPoolSize = s;
workerAdded = true;
}
} finally {
// 释放锁
mainLock.unlock();
}
// 如果添加worker成功,则启动该worker对应的线程
if (workerAdded) {
t.start();
workerStarted = true;
}
}
} finally {
// 如果启动新线程失败
if (! workerStarted)
// workCount - 1
addWorkerFailed(w);
}
return workerStarted;
}
2
3
4
5
6
7
8
9
10
11
12
13
14
15
16
17
18
19
20
21
22
23
24
25
26
27
28
29
30
31
32
33
34
35
36
37
38
39
40
41
42
43
44
45
46
47
48
49
50
51
52
53
54
55
56
57
58
59
60
61
62
63
64
65
66
67
68
69
70
71
72
73
74
75
76
77
78
79
80
81
82
83
84
85
86
87
88
89
90
91
92
93
94
95
96
97
98
99
100
101
102
# 3.5 任务的执行过程分析
在上面的任务提交过程中,可能会开启一个新的Worker,并把任务本身作为firstTask赋给该
Worker。但对于一个Worker来说,不是只执行一个任务,而是源源不断地从队列中取任务执行,这是一个不断循环的过程。
下面来看Woker的run()方法的实现过程。
private final class Worker extends AbstractQueuedSynchronizer implements
Runnable {
  // 当前Worker对象封装的线程
  final Thread thread;
 // 线程需要运行的第一个任务。可以是null,如果是null,则线程从队列获取任务
  Runnable firstTask;
  // 记录线程执行完成的任务数量,每个线程一个计数器
  volatile long completedTasks;
  /**
    * 使用给定的第一个任务并利用线程工厂创建Worker实例
    * @param firstTask 线程的第一个任务,如果没有,就设置为null,此时线程会从队列
获取任务。
    */
  Worker(Runnable firstTask) {
    setState(-1); // 线程处于阻塞状态,调用runWorker的时候中断
    this.firstTask = firstTask;
    this.thread = getThreadFactory().newThread(this);
 }
  // 调用ThreadPoolExecutor的runWorker方法执行线程的运行
  public void run() {
    runWorker(this);
 }
}
final void runWorker(Worker w) {
  Thread wt = Thread.currentThread();
  Runnable task = w.firstTask;
  w.firstTask = null;
  // 中断Worker封装的线程
  w.unlock();
  boolean completedAbruptly = true;
  try {
    // 如果线程初始任务不是null,或者从队列获取的任务不是null,表示该线程应该执行任
务。
    while (task != null || (task = getTask()) != null) {
      // 获取线程锁
      w.lock();
      // 如果线程池停止了,确保线程被中断
      // 如果线程池正在运行,确保线程不被中断
      if ((runStateAtLeast(ctl.get(), STOP) ||
        (Thread.interrupted() &&
         runStateAtLeast(ctl.get(), STOP))) &&
        !wt.isInterrupted())
        // 获取到任务后,再次检查线程池状态,如果发现线程池已经停止,则给自己发中断信号
        wt.interrupt();
      try {
        // 任务执行之前的钩子方法,实现为空
        beforeExecute(wt, task);
        try {
          task.run();
          // 任务执行结束后的钩子方法,实现为空
          afterExecute(task, null);
       } catch (Throwable ex) {
          afterExecute(task, ex);
          throw ex;
       }
     } finally {
        // 任务执行完成,将task设置为null
        task = null;
      // 线程已完成的任务数加1
        w.completedTasks++;
        // 释放线程锁
        w.unlock();
     }
   }
    // 判断线程是否是正常退出
    completedAbruptly = false;
 } finally {
    // Worker退出
    processWorkerExit(w, completedAbruptly);
 }
}
2
3
4
5
6
7
8
9
10
11
12
13
14
15
16
17
18
19
20
21
22
23
24
25
26
27
28
29
30
31
32
33
34
35
36
37
38
39
40
41
42
43
44
45
46
47
48
49
50
51
52
53
54
55
56
57
58
59
60
61
62
63
64
65
66
67
68
69
70
71
# 1.shutdown()与任务执行过程综合分析
把任务的执行过程和上面的线程池的关闭过程结合起来进行分析,当调用 shutdown()的时候,可能出现以下几种场景:
- 当调用shutdown()的时候,所有线程都处于空闲状态。
这意味着任务队列一定是空的。此时,所有线程都会阻塞在 getTask()方法的地方。然后,所有线程都会收到interruptIdleWorkers()发来的中断信号,getTask()返回null,所有Worker都
会退出while循环,之后执行processWorkerExit。
- 当调用shutdown()的时候,所有线程都处于忙碌状态。
此时,队列可能是空的,也可能是非空的。interruptIdleWorkers()内部的tryLock调用失败,
什么都不会做,所有线程会继续执行自己当前的任务。之后所有线程会执行完队列中的任务,
直到队列为空,getTask()才会返回null。之后,就和场景1一样了,退出while循环。
- 当调用shutdown()的时候,部分线程忙碌,部分线程空闲。
有部分线程空闲,说明队列一定是空的,这些线程肯定阻塞在 getTask()方法的地方。空闲的
这些线程会和场景1一样处理,不空闲的线程会和场景2一样处理。
下面看一下getTask()方法的内部细节:
private Runnable getTask() {
  boolean timedOut = false; // Did the last poll() time out?
  for (;;) {
    int c = ctl.get();
    // 如果线程池调用了shutdownNow(),返回null
    // 如果线程池调用了shutdown(),并且任务队列为空,也返回null
    if (runStateAtLeast(c, SHUTDOWN)
      && (runStateAtLeast(c, STOP) || workQueue.isEmpty())) {
      // 工作线程数减一
      decrementWorkerCount();
      return null;
  }
    int wc = workerCountOf(c);
    // Are workers subject to culling?
    boolean timed = allowCoreThreadTimeOut || wc > corePoolSize;
    if ((wc > maximumPoolSize || (timed && timedOut))
      && (wc > 1 || workQueue.isEmpty())) {
      if (compareAndDecrementWorkerCount(c))
        return null;
      continue;
   }
    try {
      // 如果队列为空,就会阻塞pool或者take,前者有超时时间,后者没有超时时间
      // 一旦中断,此处抛异常,对应上文场景1。
      Runnable r = timed ?
        workQueue.poll(keepAliveTime, TimeUnit.NANOSECONDS) :
        workQueue.take();
      if (r != null)
        return r;
      timedOut = true;
   } catch (InterruptedException retry) {
      timedOut = false;
   }
 }
}
2
3
4
5
6
7
8
9
10
11
12
13
14
15
16
17
18
19
20
21
22
23
24
25
26
27
28
29
30
31
32
33
34
35
# 2.shutdownNow() 与任务执行过程综合分析
和上面的 shutdown()类似,只是多了一个环节,即清空任务队列。如果一个线程正在执行某个业务代码,即使向它发送中断信号,也没有用,只能等它把代码执行完成。因此,中断空闲线程和中断所有线程的区别并不是很大,除非线程当前刚好阻塞在某个地方。
当一个Worker最终退出的时候,会执行清理工作:
private void processWorkerExit(Worker w, boolean completedAbruptly) {
  // 如果线程正常退出,不会执行if的语句,这里一般是非正常退出,需要将worker数量减一
  if (completedAbruptly)
    decrementWorkerCount();
  final ReentrantLock mainLock = this.mainLock;
  mainLock.lock();
  try {
    completedTaskCount += w.completedTasks;
    // 将自己的worker从集合移除
    workers.remove(w);
 } finally {
    mainLock.unlock();
 }
  // 每个线程在结束的时候都会调用该方法,看是否可以停止线程池
  tryTerminate();
int c = ctl.get();
  // 如果在线程退出前,发现线程池还没有关闭
  if (runStateLessThan(c, STOP)) {
    if (!completedAbruptly) {
      int min = allowCoreThreadTimeOut ? 0 : corePoolSize;
      // 如果线程池中没有其他线程了,并且任务队列非空
      if (min == 0 && ! workQueue.isEmpty())
        min = 1;
      // 如果工作线程数大于min,表示队列中的任务可以由其他线程执行,退出当前线程
      if (workerCountOf(c) >= min)
        return; // replacement not needed
   }
    // 如果当前线程退出前发现线程池没有结束,任务队列不是空的,也没有其他线程来执行
    // 就再启动一个线程来处理。
    addWorker(null, false);
 }
}
2
3
4
5
6
7
8
9
10
11
12
13
14
15
16
17
18
19
20
21
22
23
24
25
26
27
28
29
30
31
32
# 3.6 线程池的4种拒绝策略
在execute(Runnable command)的最后,调用了reject(command)执行拒绝策略,代码如下所示:

handler就是我们可以设置的拒绝策略管理器:

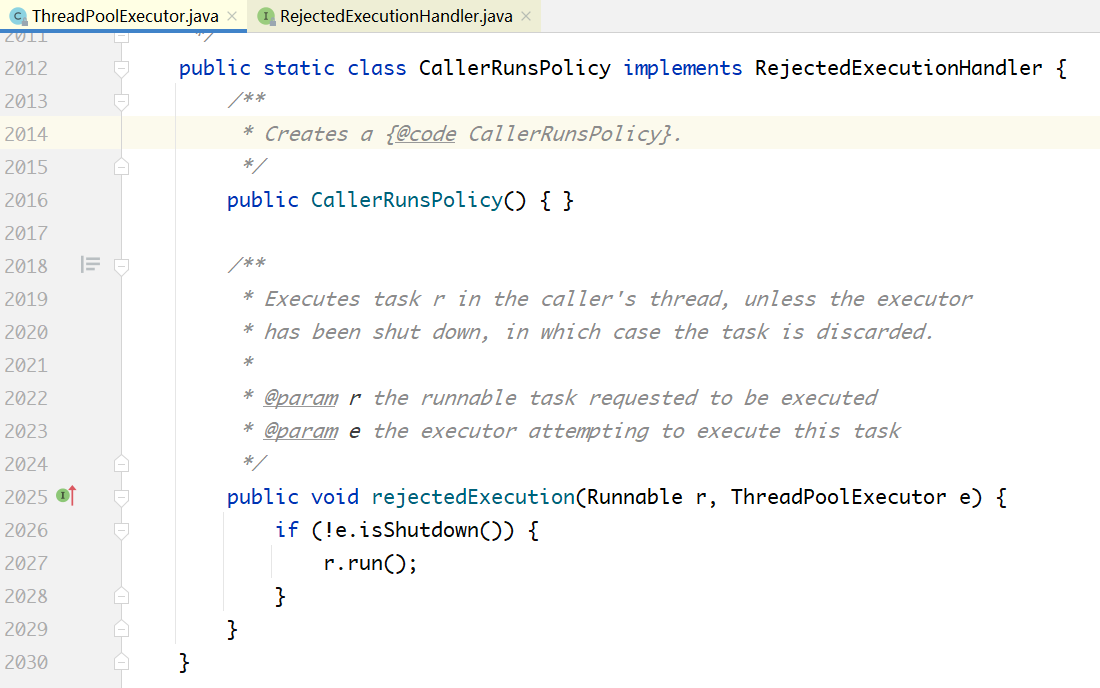
RejectedExecutionHandler 是一个接口,定义了四种实现,分别对应四种不同的拒绝策略,默认是AbortPolicy。
package java.util.concurrent;
public interface RejectedExecutionHandler {
  void rejectedExecution(Runnable r, ThreadPoolExecutor executor);
}
2
3
4
ThreadPoolExecutor类中默认的实现是:

四种策略的实现代码如下:
**策略1:**调用者直接在自己的线程里执行,线程池不处理,比如到医院打点滴,医院没地方了,到你家自己操作吧:
**策略2:**线程池抛异常:
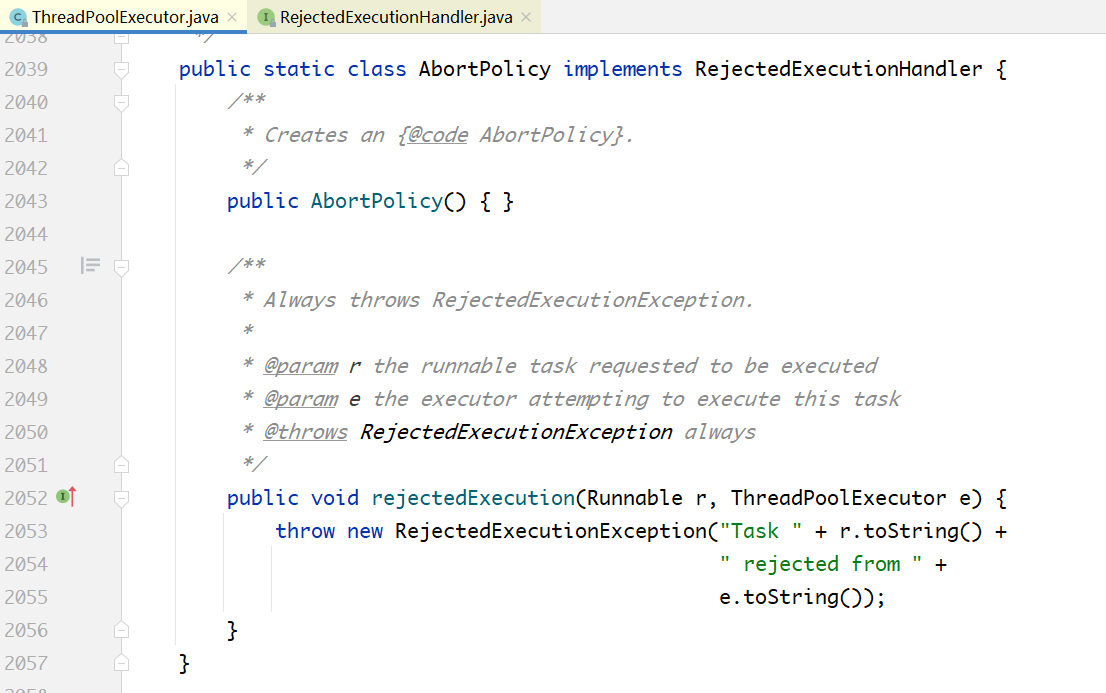
**策略3:**线程池直接丢掉任务,神不知鬼不觉:
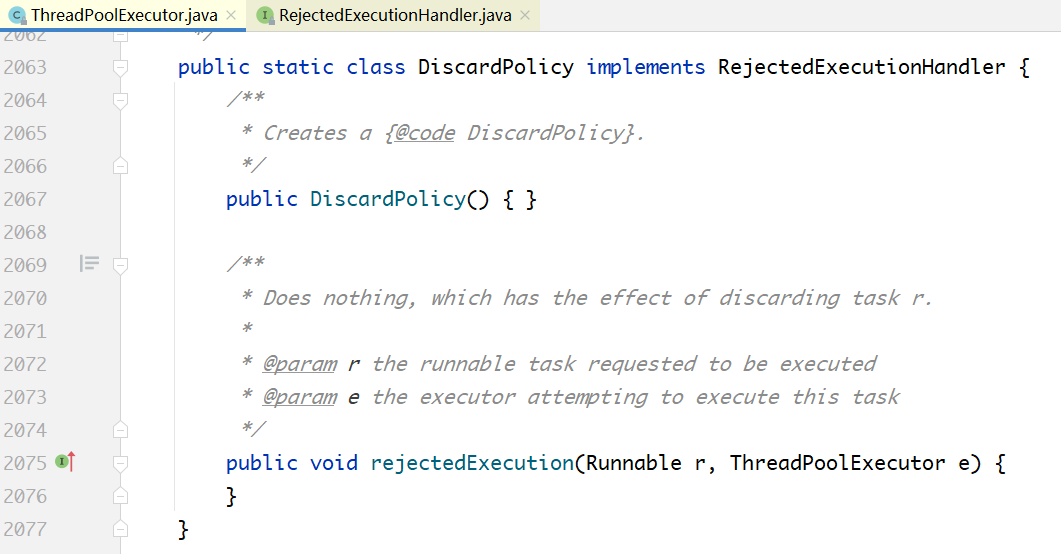
**策略4:**删除队列中最早的任务,将当前任务入队列:
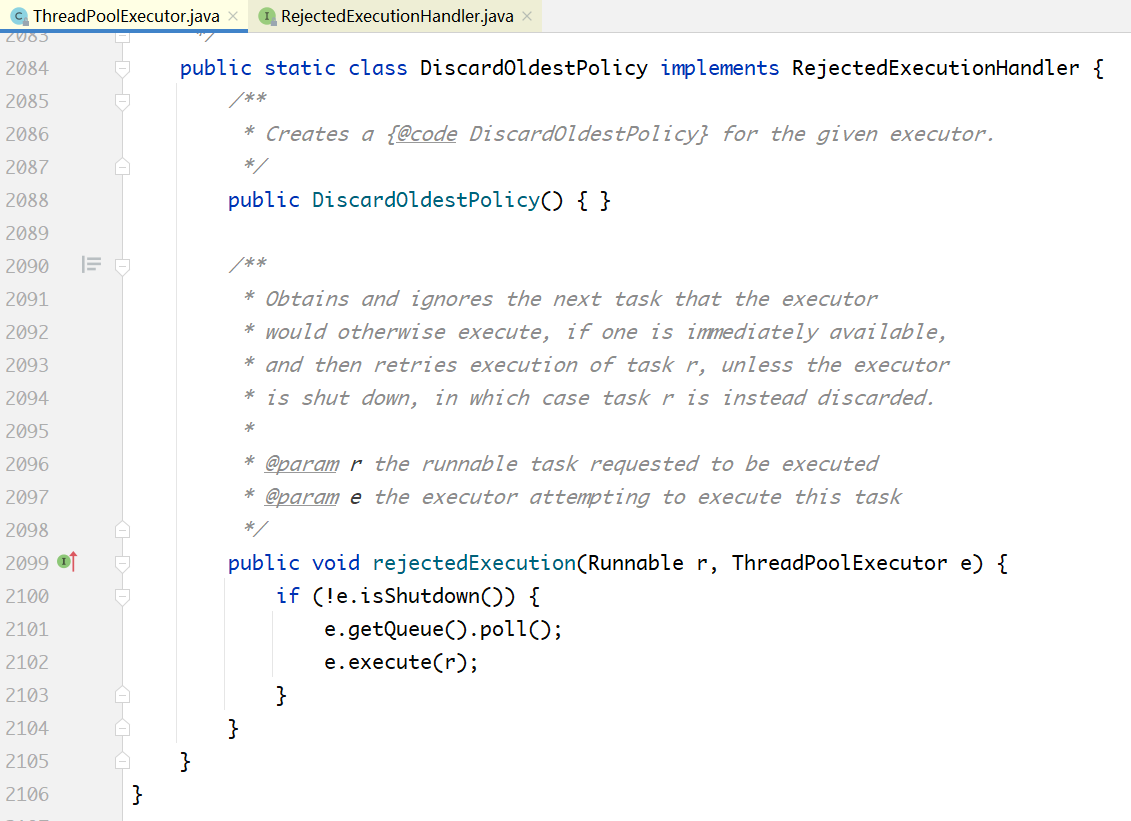
示例程序:
package com.lagou.concurrent.demo;
import java.util.concurrent.ArrayBlockingQueue;
import java.util.concurrent.ThreadPoolExecutor;
import java.util.concurrent.TimeUnit;
public class ThreadPoolExecutorDemo {
  public static void main(String[] args) {
    ThreadPoolExecutor executor = new ThreadPoolExecutor(
        3,
        5,
        1,
        TimeUnit.SECONDS,
        new ArrayBlockingQueue<>(3),
//        new ThreadPoolExecutor.AbortPolicy()
//        new ThreadPoolExecutor.CallerRunsPolicy()
//        new ThreadPoolExecutor.DiscardOldestPolicy()
        new ThreadPoolExecutor.DiscardPolicy()
   );
    for (int i = 0; i < 20; i++) {
      int finalI = i;
      executor.execute(new Runnable() {
        @Override
        public void run() {
          System.out.println(Thread.currentThread().getId() + "["
+ finalI + "] -- 开始");
          try {
            Thread.sleep(5000);
       } catch (InterruptedException e) {
            e.printStackTrace();
         }
          System.out.println(Thread.currentThread().getId()  + "["
+ finalI + "] -- 结束");
       }
     });
      try {
        Thread.sleep(200);
     } catch (InterruptedException e) {
        e.printStackTrace();
     }
   }
    executor.shutdown();
    boolean flag = true;
    try {
      do {
        flag = !executor.awaitTermination(1, TimeUnit.SECONDS);
        System.out.println(flag);
     } while (flag);
   } catch (InterruptedException e) {
      e.printStackTrace();
   }
    System.out.println("线程池关闭成功。。。");
    System.out.println(Thread.currentThread().getId());
 }
}
2
3
4
5
6
7
8
9
10
11
12
13
14
15
16
17
18
19
20
21
22
23
24
25
26
27
28
29
30
31
32
33
34
35
36
37
38
39
40
41
42
43
44
45
46
47
48
49
50
51
52
53
# 4 Executors工具类
concurrent包提供了Executors工具类,利用它可以创建各种不同类型的线程池。
# 4.1 四种对比
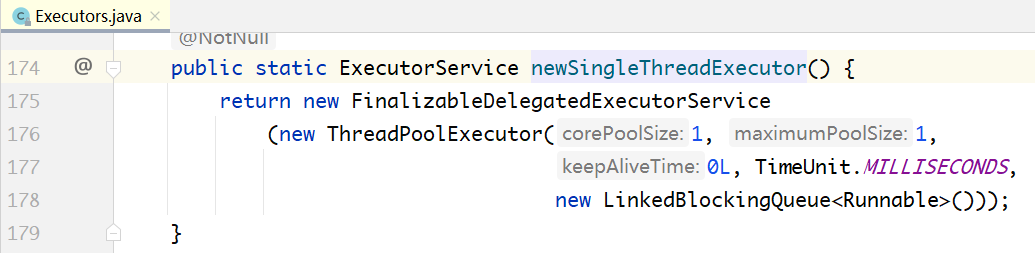
单线程的线程池:
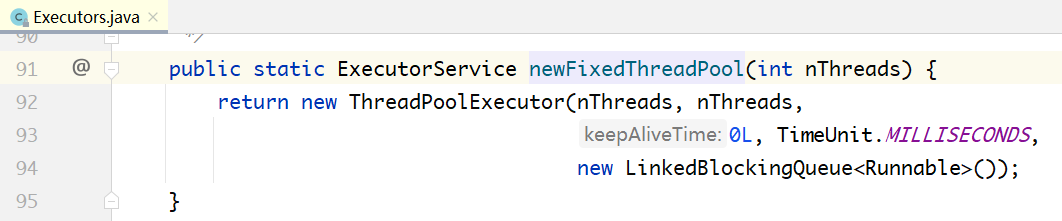
固定数目线程的线程池:
每接收一个请求,就创建一个线程来执行:
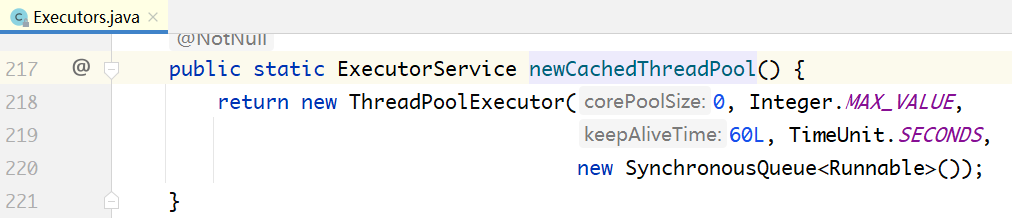
单线程具有周期调度功能的线程池:

多线程,有调度功能的线程池:

# 4.2 最佳实践
不同类型的线程池,其实都是由前面的几个关键配置参数配置而成的。
在《阿里巴巴Java开发手册》中,明确禁止使用Executors创建线程池,并要求开发者直接使用
ThreadPoolExector或ScheduledThreadPoolExecutor进行创建。这样做是为了强制开发者明确线程池的运行策略,使其对线程池的每个配置参数皆做到心中有数,以规避因使用不当而造成资源耗尽的风险。
# 5 ScheduledThreadPoolExecutor
ScheduledThreadPoolExecutor实现了按时间调度来执行任务:
- 延迟执行任务


- 周期执行任务
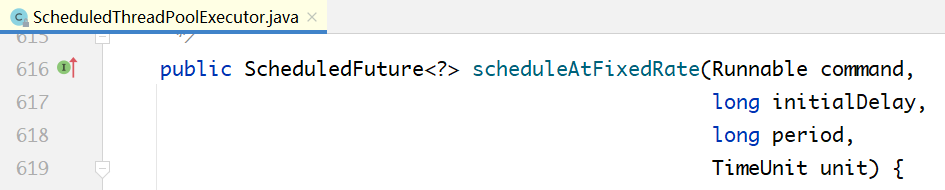

区别如下:
AtFixedRate:按固定频率执行,与任务本身执行时间无关。但有个前提条件,任务执行时间必须小于间隔时间,例如间隔时间是5s,每5s执行一次任务,任务的执行时间必须小于5s。
WithFixedDelay:按固定间隔执行,与任务本身执行时间有关。例如,任务本身执行时间是10s,间隔2s,则下一次开始执行的时间就是12s。
# 5.1 延迟执行和周期性执行的原理
ScheduledThreadPoolExecutor继承了ThreadPoolExecutor,这意味着其内部的数据结构和
ThreadPoolExecutor是基本一样的,那它是如何实现延迟执行任务和周期性执行任务的呢?
延迟执行任务依靠的是DelayQueue。DelayQueue是 BlockingQueue的一种,其实现原理是二叉堆。
而周期性执行任务是执行完一个任务之后,再把该任务扔回到任务队列中,如此就可以对一个任务反复执行。
不过这里并没有使用DelayQueue,而是在ScheduledThreadPoolExecutor内部又实现了一个特定的DelayQueue。

其原理和DelayQueue一样,但针对任务的取消进行了优化。下面主要讲延迟执行和周期性执行的实现过程。
# 5.2 延迟执行
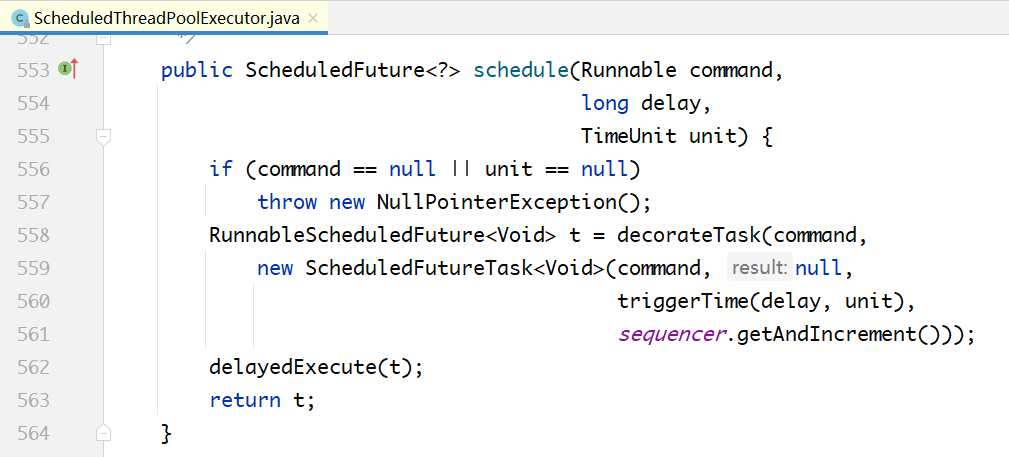
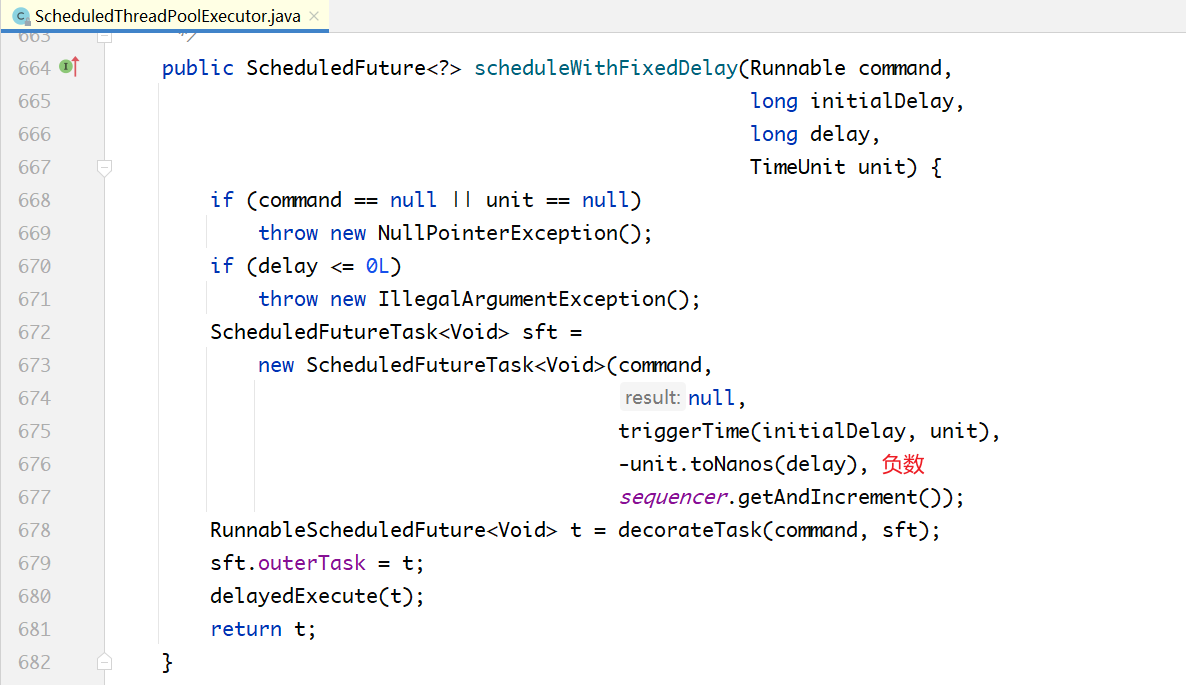
传进去的是一个Runnable,外加延迟时间delay。在内部通过decorateTask(...)方法把Runnable包装成一个ScheduleFutureTask对象,而DelayedWorkQueue中存放的正是这种类型的对象,这种类型的对象一定实现了Delayed接口。

从上面的代码中可以看出,schedule()方法本身很简单,就是把提交的Runnable任务加上delay时间,转换成ScheduledFutureTask对象,放入DelayedWorkerQueue中。任务的执行过程还是复用的ThreadPoolExecutor,延迟的控制是在DelayedWorkerQueue内部完成的。
# 5.3 周期性执行
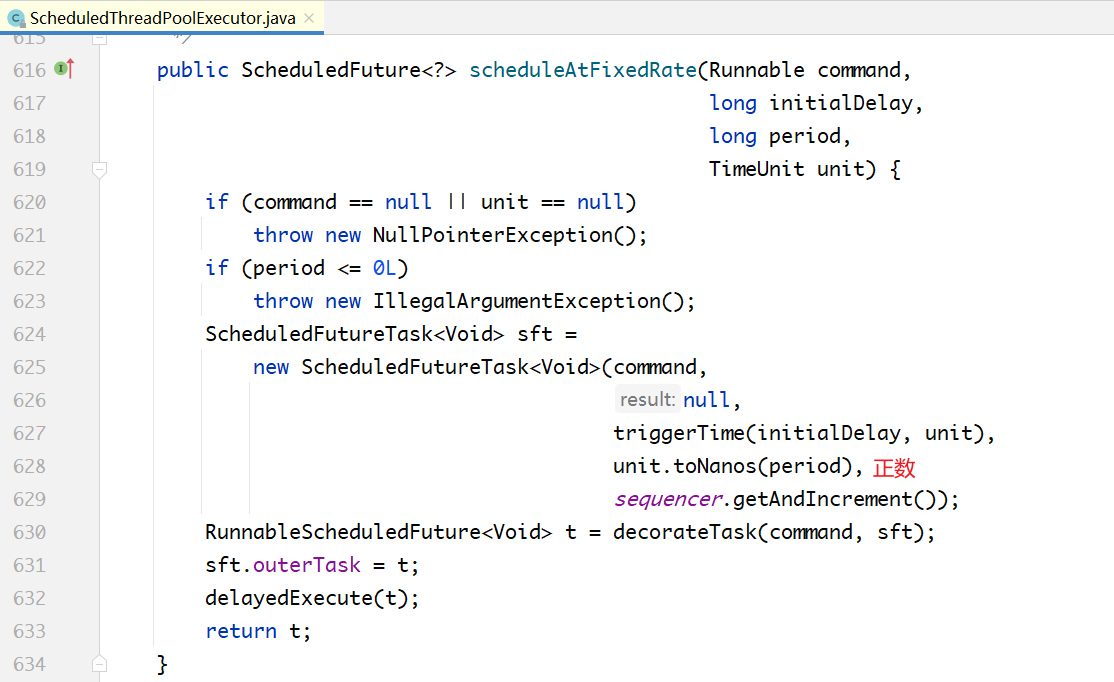
和schedule(...)方法的框架基本一样,也是包装一个ScheduledFutureTask对象,只是在延迟时间参数之外多了一个周期参数,然后放入DelayedWorkerQueue就结束了。
两个方法的区别在于一个传入的周期是一个负数,另一个传入的周期是一个正数,为什么要这样做呢?
用于生成任务序列号的sequencer,创建ScheduledFutureTask的时候使用:

private class ScheduledFutureTask<V>
extends FutureTask<V> implements RunnableScheduledFuture<V> {
private final long sequenceNumber;
private volatile long time;
private final long period;
ScheduledFutureTask(Runnable r, V result, long triggerTime,
long period, long sequenceNumber) {
super(r, result);
this.time = triggerTime; // 延迟时间
this.period = period; // 周期
this.sequenceNumber = sequenceNumber;
}
// 实现Delayed接口
public long getDelay(TimeUnit unit) {
return unit.convert(time - System.nanoTime(), NANOSECONDS);
}
// 实现Comparable接口
public int compareTo(Delayed other) {
if (other == this) // compare zero if same object
return 0;
if (other instanceof ScheduledFutureTask) {
ScheduledFutureTask<?> x = (ScheduledFutureTask<?>)other;
long diff = time - x.time;
if (diff < 0)
return -1;
else if (diff > 0)
return 1;
// 延迟时间相等,进一步比较序列号
else if (sequenceNumber < x.sequenceNumber)
return -1;
else
return 1;
}
long diff = getDelay(NANOSECONDS) - other.getDelay(NANOSECONDS);
return (diff < 0) ? -1 : (diff > 0) ? 1 : 0;
}
// 实现Runnable接口
public void run() {
if (!canRunInCurrentRunState(this))
cancel(false);
// 如果不是周期执行,则执行一次
else if (!isPeriodic())
super.run();
// 如果是周期执行,则重新设置下一次运行的时间,重新入队列
else if (super.runAndReset()) {
setNextRunTime();
reExecutePeriodic(outerTask);
}
}
// 下一次执行时间
private void setNextRunTime() {
long p = period;
if (p > 0)
time += p;
else
time = triggerTime(-p);
}
}
// 下一次触发时间
long triggerTime(long delay) {
return System.nanoTime() +
((delay < (Long.MAX_VALUE >> 1)) ? delay : overflowFree(delay));
}
// 放到队列中,等待下一次执行
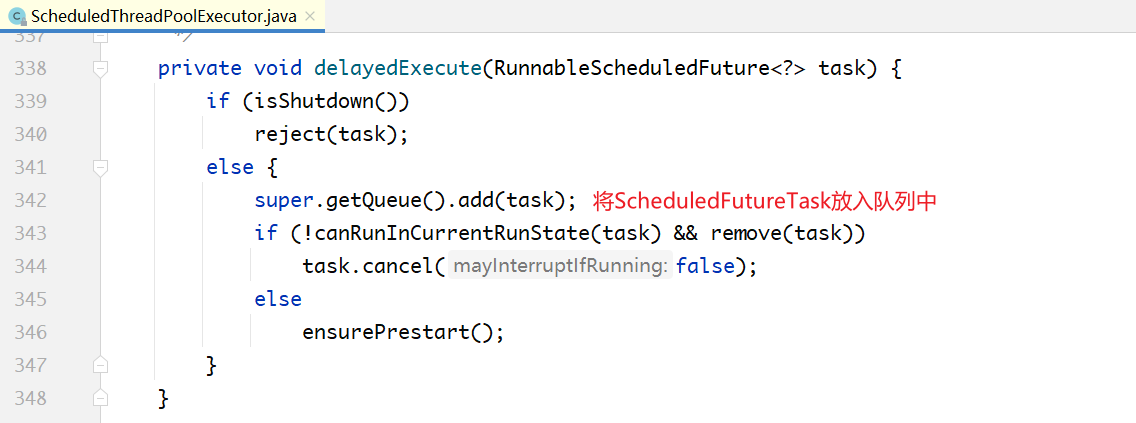
void reExecutePeriodic(RunnableScheduledFuture<?> task) {
if (canRunInCurrentRunState(task)) {
super.getQueue().add(task);
if (canRunInCurrentRunState(task) || !remove(task)) {
ensurePrestart();
return;
}
}
task.cancel(false);
}
2
3
4
5
6
7
8
9
10
11
12
13
14
15
16
17
18
19
20
21
22
23
24
25
26
27
28
29
30
31
32
33
34
35
36
37
38
39
40
41
42
43
44
45
46
47
48
49
50
51
52
53
54
55
56
57
58
59
60
61
62
63
64
65
66
67
68
69
70
71
72
73
74
75
76
77
78
79
withFixedDelay和atFixedRate的区别就体现在setNextRunTime里面。
如果是atFixedRate,period>0,下一次开始执行时间等于上一次开始执行时间+period;
如果是withFixedDelay,period < 0,下一次开始执行时间等于triggerTime(-p),为now+(-
period),now即上一次执行的结束时间。
# 6 CompletableFuture用法
从JDK 8开始,在Concurrent包中提供了一个强大的异步编程工具CompletableFuture。在JDK8之前,异步编程可以通过线程池和Future来实现,但功能还不够强大。
注意:CompletableFuture是否使用默认线程池的依据,和机器的CPU核心数有关。当CPU核心数减1大于1时(CPU核心数>2时),才会使用默认的线程池(ForkJoinPool),否则将会为每个CompletableFuture的任务创建一个新线程去执行。 即,CompletableFuture的默认线程池,只有在双核以上的机器内才会使用。在双核及以下的机器中,会为每个任务创建一个新线程,等于没有使用线程池,且有资源耗尽的风险。 https://zhuanlan.zhihu.com/p/585406446?utm_id=0 所以开发时一定要要注意设置asyncTaskExecutor自定义异步线程池: CompletableFuture<Map<String, Object>> f = CompletableFuture.supplyAsync(() -> xxxxxxx, asyncTaskExecutor);
示例代码:
package com.lagou.concurrent.demo;
import java.util.concurrent.CompletableFuture;
import java.util.concurrent.ExecutionException;
public class CompletableFutureDemo {
  public static void main(String[] args) throws ExecutionException,
InterruptedException {
    CompletableFuture<String> future = new CompletableFuture<>();
    new Thread(() -> {
      try {
        Thread.sleep(1000);
     } catch (InterruptedException e) {
        e.printStackTrace();
     }
      future.complete("hello world");
   }).start();
    System.out.println("获取结果中。。。");
    String result = future.get();
    System.out.println("获取的结果:" + result);
 }
}
2
3
4
5
6
7
8
9
10
11
12
13
14
15
16
17
18
19
20
CompletableFuture实现了Future接口,所以它也具有Future的特性:调用get()方法会阻塞在那,直到结果返回。
另外1个线程调用complete方法完成该Future,则所有阻塞在get()方法的线程都将获得返回结果。
# 6.1 runAsync与supplyAsync
上面的例子是一个空的任务,下面尝试提交一个真的任务,然后等待结果返回。
# 例1:runAsync(Runnable)
package com.lagou.concurrent.demo;
import java.util.concurrent.CompletableFuture;
import java.util.concurrent.ExecutionException;
public class CompletableFutureDemo2 {
  public static void main(String[] args) throws ExecutionException,
InterruptedException {
    CompletableFuture<Void> voidCompletableFuture =
CompletableFuture.runAsync(() -> {
      try {
        Thread.sleep(2000);
        System.out.println("任务执行完成");
     } catch (InterruptedException e) {
        e.printStackTrace();
     }
   });
    // 阻塞,等待任务执行完成
    voidCompletableFuture.get();
    System.out.println("程序运行结束");
  }
}
2
3
4
5
6
7
8
9
10
11
12
13
14
15
16
17
18
19
20
CompletableFuture.runAsync(...)传入的是一个Runnable接口。
# 例2:supplyAsync(Supplier)
package com.lagou.concurrent.demo;
import java.util.concurrent.CompletableFuture;
import java.util.concurrent.ExecutionException;
import java.util.concurrent.TimeUnit;
import java.util.function.Supplier;
public class CompletableFutureDemo3 {
  public static void main(String[] args) throws ExecutionException,
InterruptedException {
    CompletableFuture<String> future = CompletableFuture.supplyAsync(new
Supplier<String>() {
      @Override
      public String get() {
        try {
          TimeUnit.SECONDS.sleep(2);
       } catch (InterruptedException e) {
          e.printStackTrace();
       }
        return "这是结果";
     }
   });
    String result = future.get();
    System.out.println("任务执行结果:" + result);
 }
}
2
3
4
5
6
7
8
9
10
11
12
13
14
15
16
17
18
19
20
21
22
23
24
例2和例1的区别在于,例2的任务有返回值。没有返回值的任务,提交的是Runnable,返回的是CompletableFuture<Void>;有返回值的任务,提交的是 Supplier,返回的是CompletableFuture<String>。Supplier和前面的Callable很相似。
通过上面两个例子可以看出,在基本的用法上,CompletableFuture和Future很相似,都可以提交两类任务:一类是无返回值的,另一类是有返回值的。
# 6.2 thenRun、thenAccept和thenApply
对于 Future,在提交任务之后,只能调用 get()等结果返回;但对于 CompletableFuture,可以在结果上面再加一个callback,当得到结果之后,再接着执行callback。
# 例1:thenRun(Runnable)
package com.lagou.concurrent.demo;
import java.util.concurrent.CompletableFuture;
import java.util.concurrent.ExecutionException;
import java.util.concurrent.TimeUnit;
public class CompletableFutureDemo4 {
  public static void main(String[] args) throws ExecutionException,
InterruptedException {
    CompletableFuture voidCompletableFuture =
CompletableFuture.supplyAsync(() -> {
      try {
        Thread.sleep(5);
     } catch (InterruptedException e) {
        e.printStackTrace();
     }
      return "这是结果";
   }).thenRun(() -> {
      try {
        Thread.sleep(2);
     } catch (InterruptedException e) {
        e.printStackTrace();
     }
      System.out.println("任务执行结束之后执行的语句");
   });
    // 阻塞等待任务执行完成
    voidCompletableFuture.get();
    System.out.println("任务执行结束");
 }
}
2
3
4
5
6
7
8
9
10
11
12
13
14
15
16
17
18
19
20
21
22
23
24
25
26
27
28
该案例最后不能获取到结果,只会得到一个null。
# 例2:thenAccept(Consumer)
package com.lagou.concurrent.demo;
import java.util.concurrent.CompletableFuture;
import java.util.concurrent.ExecutionException;
import java.util.function.Consumer;
public class CompletableFutureDemo5 {
  public static void main(String[] args) throws ExecutionException,
InterruptedException {
    CompletableFuture<Void> future = CompletableFuture.supplyAsync(() ->
{
      try {
        Thread.sleep(5000);
     } catch (InterruptedException e) {
        e.printStackTrace();
     }
      System.out.println("返回中间结果");
      return "这是中间结果";
   }).thenAccept((param) -> {
      try {
        Thread.sleep(2000);
     } catch (InterruptedException e) {
        e.printStackTrace();
     }
      System.out.println("任务执行后获得前面的中间结果:" + param);
   });
    // 阻塞等待任务执行完成
    future.get();
    System.out.println("任务执行完成");
 }
}
2
3
4
5
6
7
8
9
10
11
12
13
14
15
16
17
18
19
20
21
22
23
24
25
26
27
28
29
上述代码在thenAccept中可以获取任务的执行结果,接着进行处理。
# 例3:thenApply(Function)
package com.lagou.concurrent.demo;
import java.util.concurrent.CompletableFuture;
import java.util.concurrent.ExecutionException;
import java.util.function.Function;
public class CompletableFutureDemo6 {
  public static void main(String[] args) throws ExecutionException,
InterruptedException {
    CompletableFuture<Integer> future = CompletableFuture.supplyAsync(()
-> {
      try {
        Thread.sleep(5000);
     } catch (InterruptedException e) {
        e.printStackTrace();
     }
      System.out.println("返回中间结果");
      return "abcdefg";
   }).thenApply(new Function<String, Integer>() {
      @Override
      public Integer apply(String middle) {
        try {
          Thread.sleep(2000);
       } catch (InterruptedException e) {
          e.printStackTrace();
       }
        System.out.println("获取中间结果,再次计算返回");
        return middle.length();
     }
   });
    Integer integer = future.get();
    System.out.println("最终的结果为:" + integer);
 }
}
2
3
4
5
6
7
8
9
10
11
12
13
14
15
16
17
18
19
20
21
22
23
24
25
26
27
28
29
30
31
32
三个例子都是在任务执行完成之后,接着执行回调,只是回调的形式不同:
thenRun后面跟的是一个无参数、无返回值的方法,即Runnable,所以最终的返回值是
CompletableFuture<Void>类型。thenAccept后面跟的是一个有参数、无返回值的方法,称为Consumer,返回值也是
CompletableFuture<Void>类型。顾名思义,只进不出,所以称为Consumer;前面的 Supplier,是无参数,有返回值,只出不进,和Consumer刚好相反。thenApply 后面跟的是一个有参数、有返回值的方法,称为Function。返回值是
CompletableFuture<String>类型。
而参数接收的是前一个任务,即 supplyAsync(...)这个任务的返回值。因此这里只能用
supplyAsync,不能用runAsync。因为runAsync没有返回值,不能为下一个链式方法传入参数。
# 6.3 thenCompose与thenCombine
# 例1:thenCompose
在上面的例子中,thenApply接收的是一个Function,但是这个Function的返回值是一个通常的基本数据类型或一个对象,而不是另外一个 CompletableFuture。如果 Function 的返回值也是一个CompletableFuture,就会出现嵌套的CompletableFuture。考虑下面的例子:
CompletableFuture<CompletableFuture<Integer>> future =
CompletableFuture.supplyAsync(new Supplier<String>() {
  @Override
  public String get() {
return "hello world";
 }
}).thenApply(new Function<String, CompletableFuture<Integer>>() {
  @Override
  public CompletableFuture<Integer> apply(String s) {
    return CompletableFuture.supplyAsync(new Supplier<Integer>() {
      @Override
      public Integer get() {
        return s.length();
     }
   });
 }
});
CompletableFuture<Integer> future1 = future.get();
Integer result = future1.get();
System.out.println(result);
2
3
4
5
6
7
8
9
10
11
12
13
14
15
16
17
18
19
20
如果希望返回值是一个非嵌套的CompletableFuture,可以使用thenCompose:
CompletableFuture<Integer> future = CompletableFuture.supplyAsync(new
Supplier<String>() {
  @Override
  public String get() {
    return "hello world";
 }
}).thenCompose(new Function<String, CompletionStage<Integer>>() {
  @Override
  public CompletionStage<Integer> apply(String s) {
    return CompletableFuture.supplyAsync(new Supplier<Integer>() {
      @Override
      public Integer get() {
        return s.length();
     }
   });
 }
});
Integer integer = future.get();
System.out.println(integer);
2
3
4
5
6
7
8
9
10
11
12
13
14
15
16
17
18
19
下面是thenCompose方法的接口定义:

CompletableFuture中的实现:
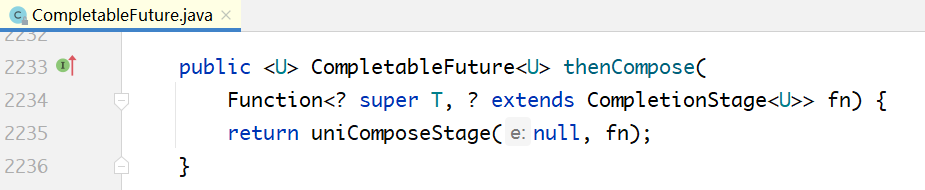
从该方法的定义可以看出,它传入的参数是一个Function类型,并且Function的返回值必须是
CompletionStage的子类,也就是CompletableFuture类型。
# 例2:thenCombine
thenCombine方法的接口定义如下,从传入的参数可以看出,它不同于thenCompose。

第1个参数是一个CompletableFuture类型,第2个参数是一个方法,并且是一个BiFunction,也就是该方法有2个输入参数,1个返回值。
从该接口的定义可以大致推测,它是要在2个 CompletableFuture 完成之后,把2个
CompletableFuture的返回值传进去,再额外做一些事情。实例如下:
CompletableFuture<Integer> future = CompletableFuture.supplyAsync(new
Supplier<String>() {
  @Override
  public String get() {
    return "hello";
 }
}).thenCombine(CompletableFuture.supplyAsync(new Supplier<String>() {
  @Override
  public String get() {
    return "lagou";
 }
}), new BiFunction<String, String, Integer>() {
  @Override
  public Integer apply(String s, String s2) {
    return s.length() + s2.length();
 }
});
Integer result = future.get();
System.out.println(result);
2
3
4
5
6
7
8
9
10
11
12
13
14
15
16
17
18
19
# 6.4 任意个CompletableFuture的组合
上面的thenCompose和thenCombine只能组合2个CompletableFuture,而接下来的allOf 和
anyOf 可以组合任意多个CompletableFuture。方法接口定义如下所示。


首先,这两个方法都是静态方法,参数是变长的CompletableFuture的集合。其次,allOf和anyOf的区别,前者是“与”,后者是“或”。
allOf的返回值是CompletableFuture<Void>类型,这是因为每个传入的CompletableFuture的返回值都可能不同,所以组合的结果是无法用某种类型来表示的,索性返回Void类型。
anyOf 的含义是只要有任意一个 CompletableFuture 结束,就可以做接下来的事情,而无须像
AllOf那样,等待所有的CompletableFuture结束。
但由于每个CompletableFuture的返回值类型都可能不同,任意一个,意味着无法判断是什么类型,所以anyOf的返回值是CompletableFuture<Object>类型。
public class CompletableFutureDemo11 {
  private static final Random RANDOM = new Random();
  private static volatile int result = 0;
  public static void main(String[] args) throws ExecutionException,
InterruptedException {
    CompletableFuture[] futures = new CompletableFuture[10];
    for (int i = 0; i < 10; i++) {
      int finalI = i;
      CompletableFuture<Void> future = CompletableFuture.runAsync(new
Runnable() {
        @Override
        public void run() {
          try {
            Thread.sleep(1000 + RANDOM.nextInt(1000));
         } catch (InterruptedException e) {
            e.printStackTrace();
         }
          result++;
    }
     });
      futures[i] = future;
   }
    System.out.println(result);
//    for (int i = 0; i < 10; i++) {
//      futures[i].get();
//      System.out.println(result);
//    }
//    Integer allResult = CompletableFuture.allOf(futures).thenApply(new
Function<Void, Integer>() {
//      @Override
//      public Integer apply(Void unused) {
//        return result;
//      }
//    }).get();
//
//    System.out.println(allResult);
    Integer anyResult = CompletableFuture.anyOf(futures).thenApply(new
Function<Object, Integer>() {
      @Override
      public Integer apply(Object o) {
        return result;
     }
   }).get();
    System.out.println(anyResult);
 }
}
2
3
4
5
6
7
8
9
10
11
12
13
14
15
16
17
18
19
20
21
22
23
24
25
26
27
28
29
30
31
32
33
34
35
36
37
38
39
40
41
42
43
44
45
46
# 6.5 四种任务原型
通过上面的例子可以总结出,提交给CompletableFuture执行的任务有四种类型:Runnable、
Consumer、Supplier、Function。下面是这四种任务原型的对比。
| 四种任务原型 | 无参数 | 有参数 |
|---|---|---|
| 无返回值 | Runnable接口对应的提交方法:runAsync,thenRun | Consumer接口对应的提交方法:thenAccept |
| 有返回值 | Supplier接口:对应的提交方法:supplierAsync | Function接口对应的提交方法:thenApply |
runAsync 与 supplierAsync 是 CompletableFuture 的静态方法;而 thenAccept、thenAsync、thenApply是CompletableFutre的成员方法。
因为初始的时候没有CompletableFuture对象,也没有参数可传,所以提交的只能是Runnable或者Supplier,只能是静态方法;
通过静态方法生成CompletableFuture对象之后,便可以链式地提交其他任务了,这个时候就可以提交Runnable、Consumer、Function,且都是成员方法。
# 6.6 CompletionStage接口
CompletableFuture不仅实现了Future接口,还实现了CompletableStage接口。

CompletionStage接口定义的正是前面的各种链式方法、组合方法,如下所示
package java.util.concurrent;
public interface CompletionStage<T> {
  //
  public CompletionStage<Void> thenRun(Runnable action);
  public CompletionStage<Void> thenAccept(Consumer<? super T> action);
  public <U> CompletionStage<U> thenApply(Function<? super T,? extends U>
fn);
  public <U> CompletionStage<U> thenCompose
   (Function<? super T, ? extends CompletionStage<U>> fn);
  public <U,V> CompletionStage<V> thenCombine
   (CompletionStage<? extends U> other,
    BiFunction<? super T,? super U,? extends V> fn);
  // ...
}
2
3
4
5
6
7
8
9
10
11
12
13
14
关于CompletionStage接口,有几个关键点要说明:
所有方法的返回值都是CompletionStage类型,也就是它自己。正因为如此,才能实现如下的链式调用:future1.thenApply(...).thenApply(...).thenCompose(...).thenRun(...)。
thenApply接收的是一个有输入参数、返回值的Function。这个Function的输入参数,必须
是?Super T 类型,也就是T或者T的父类型,而T必须是调用thenApplycompletableFuture对
象的类型;返回值则必须是?Extends U类型,也就是U或者U的子类型,而U恰好是
thenApply的返回值的CompletionStage对应的类型。
其他方法,诸如thenCompose、thenCombine也是类似的原理。
# 6.7 CompletableFuture内部原理
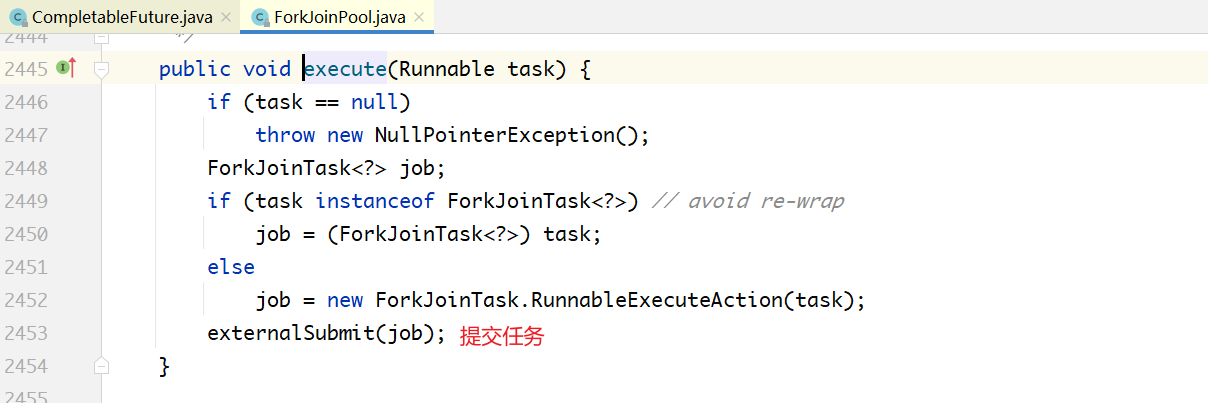
# 6.7.1 CompletableFuture的构造:ForkJoinPool
CompletableFuture中任务的执行依靠ForkJoinPool:
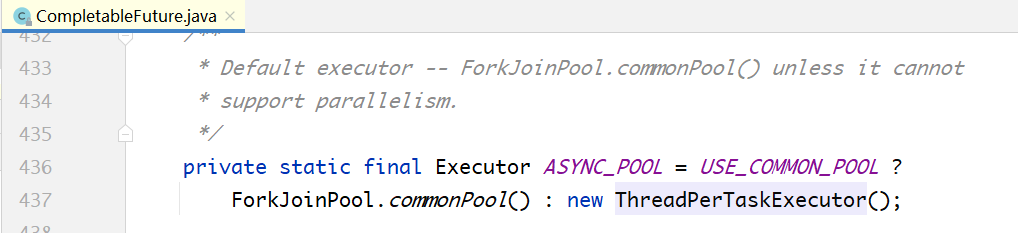
public class CompletableFuture<T> implements Future<T>, CompletionStage<T> {
private static final Executor asyncPool = useCommonPool ?
ForkJoinPool.commonPool() : new ThreadPerTaskExecutor();
public static <U> CompletableFuture<U> supplyAsync(Supplier<U> supplier)
{
return asyncSupplyStage(asyncPool, supplier);
}
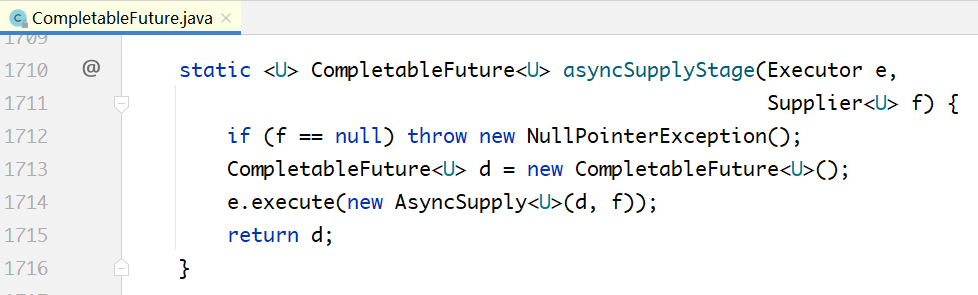
static <U> CompletableFuture<U> asyncSupplyStage(Executor e, Supplier<U>
f) {
if (f == null) throw new NullPointerException();
CompletableFuture<U> d = new CompletableFuture<U>();
// Supplier转换为ForkJoinTask
e.execute(new AsyncSupply<U>(d, f));
return d;
}
// ...
}
2
3
4
5
6
7
8
9
10
11
12
13
14
15
16
17
通过上面的代码可以看到,asyncPool是一个static类型,supplierAsync、asyncSupplyStage也都是static方法。Static方法会返回一个CompletableFuture类型对象,之后就可以链式调用,
CompletionStage里面的各个方法。
# 6.7.2 任务类型的适配
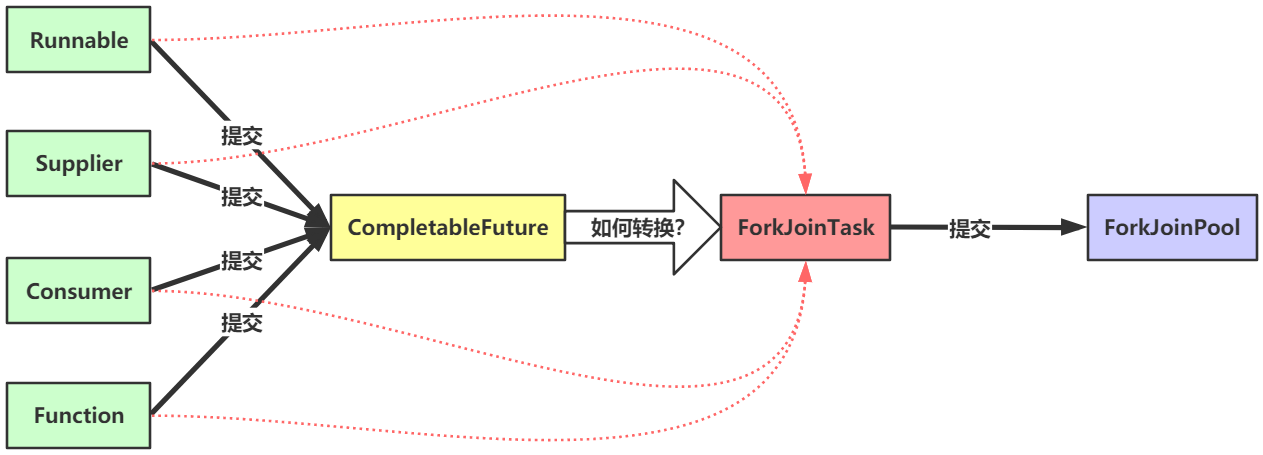
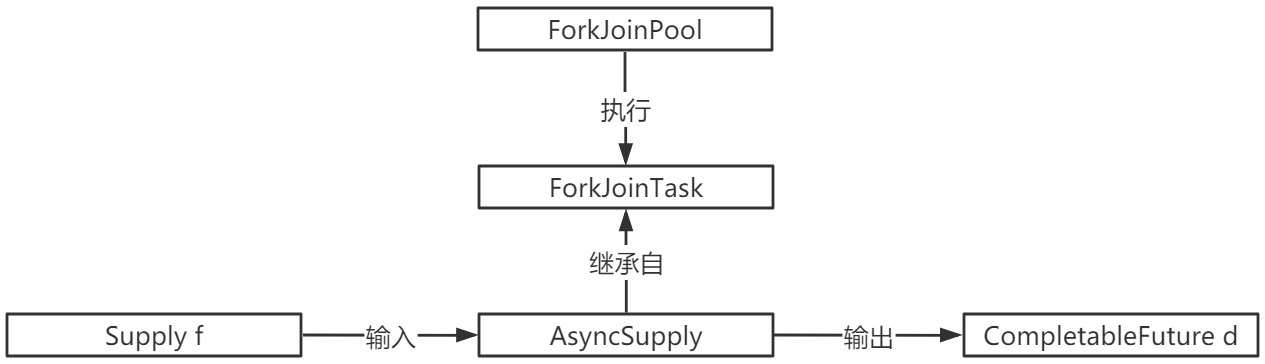
ForkJoinPool接受的任务是ForkJoinTask 类型,而我们向CompletableFuture提交的任务是
Runnable/Supplier/Consumer/Function 。因此,肯定需要一个适配机制,把这四种类型的任务转换成ForkJoinTask,然后提交给ForkJoinPool,如下图所示:
为了完成这种转换,在CompletableFuture内部定义了一系列的内部类,下图是
CompletableFuture的各种内部类的继承体系。
在 supplyAsync(...)方法内部,会把一个 Supplier 转换成一个 AsyncSupply,然后提交给
ForkJoinPool执行;
在runAsync(...)方法内部,会把一个Runnable转换成一个AsyncRun,然后提交给ForkJoinPool执
行;
在 thenRun/thenAccept/thenApply 内部,会分别把 Runnable/Consumer/Function 转换成
UniRun/UniAccept/UniApply对象,然后提交给ForkJoinPool执行;
除此之外,还有两种 CompletableFuture 组合的情况,分为“与”和“或”,所以有对应的Bi和Or类型的Completion类型。
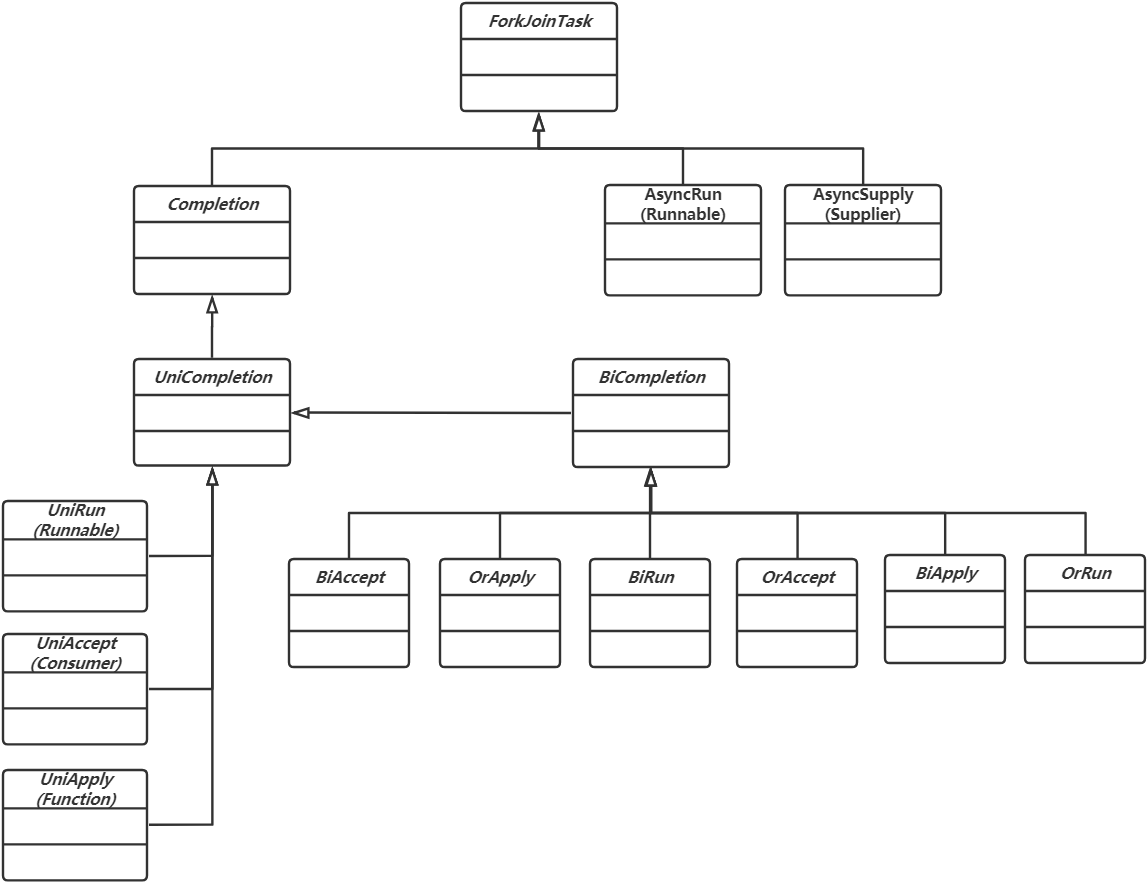
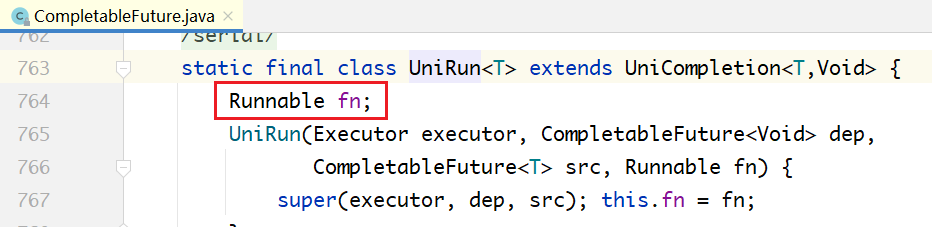
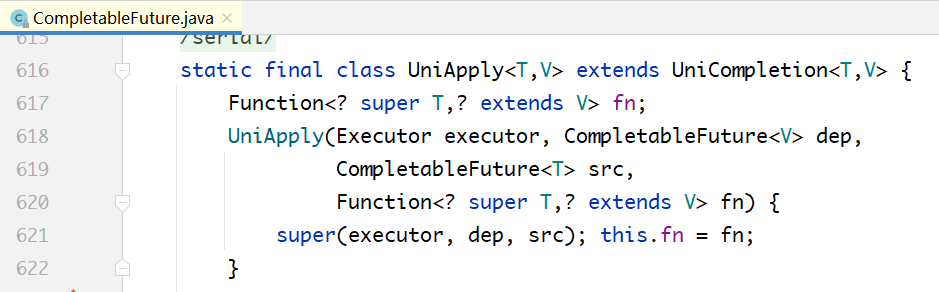
下面的代码分别为 UniRun、UniApply、UniAccept 的定义,可以看到,其内部分别封装了
Runnable、Function、Consumer。


# 6.7.3 任务的链式执行过程分析
下面以CompletableFuture.supplyAsync(...).thenApply(...).thenRun(...)链式代码为例,分析整个执行过程。
第1步:CompletableFuture future1=CompletableFuture.supplyAsync(...)

在上面的代码中,关键是构造了一个AsyncSupply对象,该对象有三个关键点:
- 它继承自ForkJoinTask,所以能够提交ForkJoinPool来执行。
- 它封装了Supplier f,即它所执行任务的具体内容。
- 该任务的返回值,即CompletableFuture d,也被封装在里面。
ForkJoinPool执行一个ForkJoinTask类型的任务,即AsyncSupply。该任务的输入就是Supply,输出结果存放在CompletableFuture中。
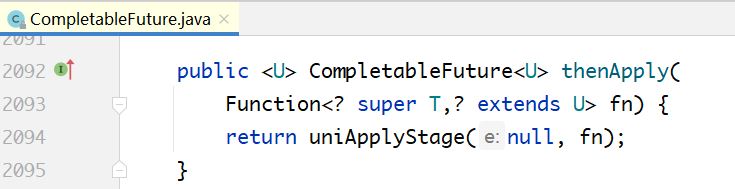
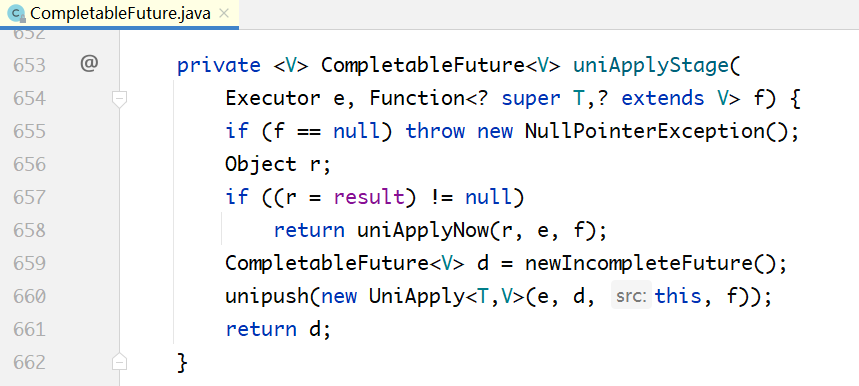
第2步:CompletableFuture future2=future1.thenApply(...)
第1步的返回值,也就是上面代码中的 CompletableFuture d,紧接着调用其成员方法thenApply:
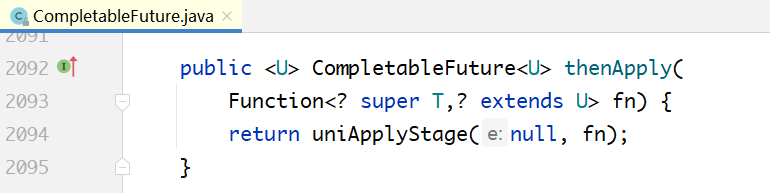
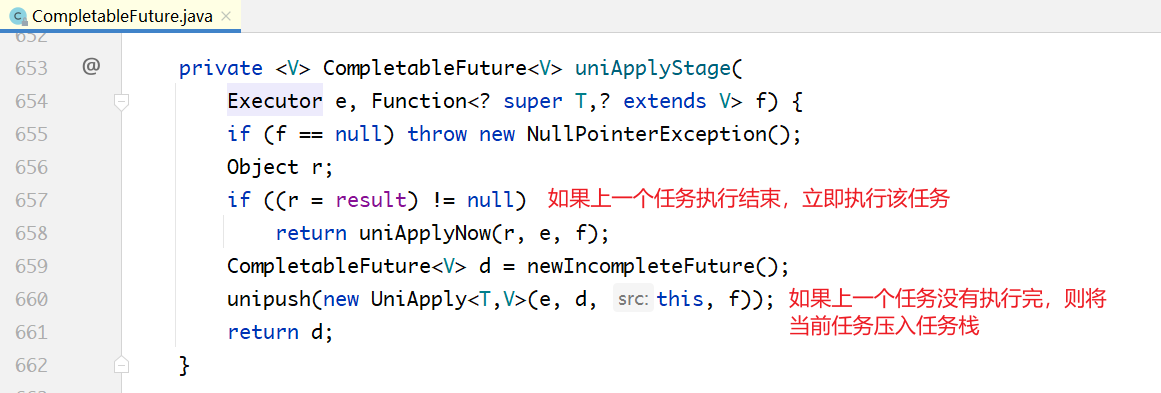
我们知道,必须等第1步的任务执行完毕,第2步的任务才可以执行。因此,这里提交的任务不可能立即执行,在此处构建了一个UniApply对象,也就是一个ForkJoinTask类型的任务,这个任务放入了第1个任务的栈当中。
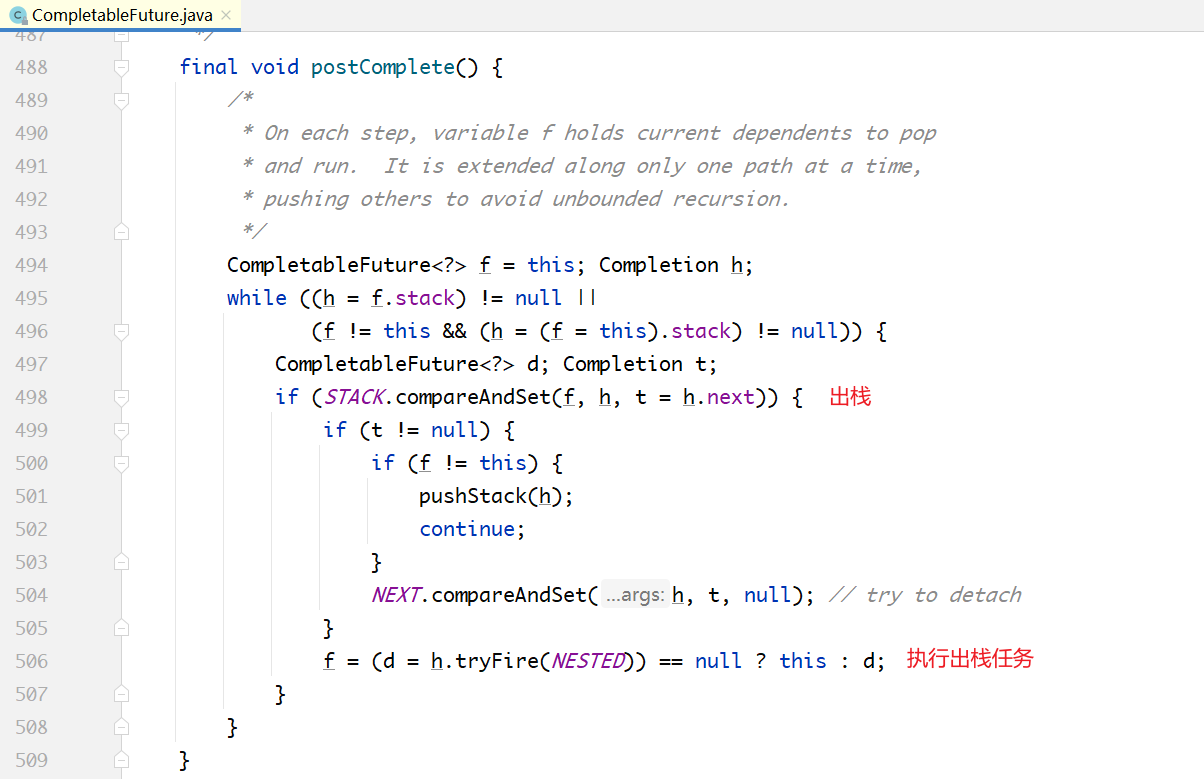
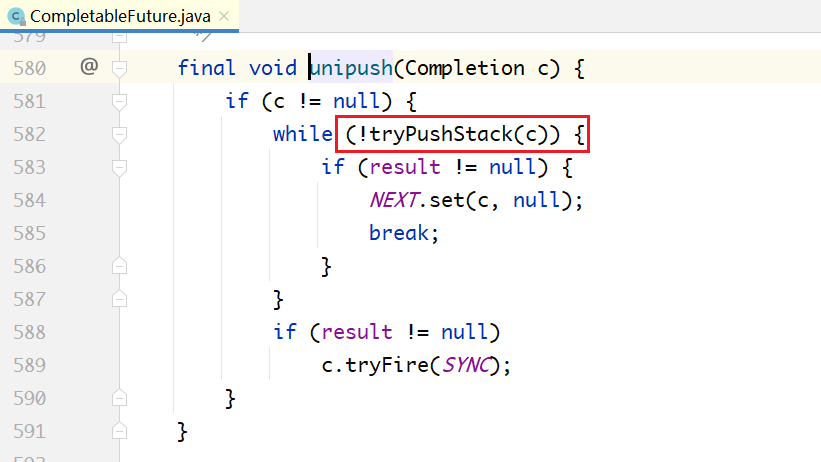
每一个CompletableFuture对象内部都有一个栈,存储着是后续依赖它的任务,如下面代码所示。这个栈也就是Treiber Stack,这里的stack存储的就是栈顶指针。

上面的UniApply对象类似于第1步里面的AsyncSupply,它的构造方法传入了4个参数:
- 第1个参数是执行它的ForkJoinPool;
- 第2个参数是输出一个CompletableFuture对象。这个参数,也是thenApply方法的返回值,用来链式执行下一个任务;
- 第3个参数是其依赖的前置任务,也就是第1步里面提交的任务;
- 第4个参数是输入(也就是一个Function对象)。
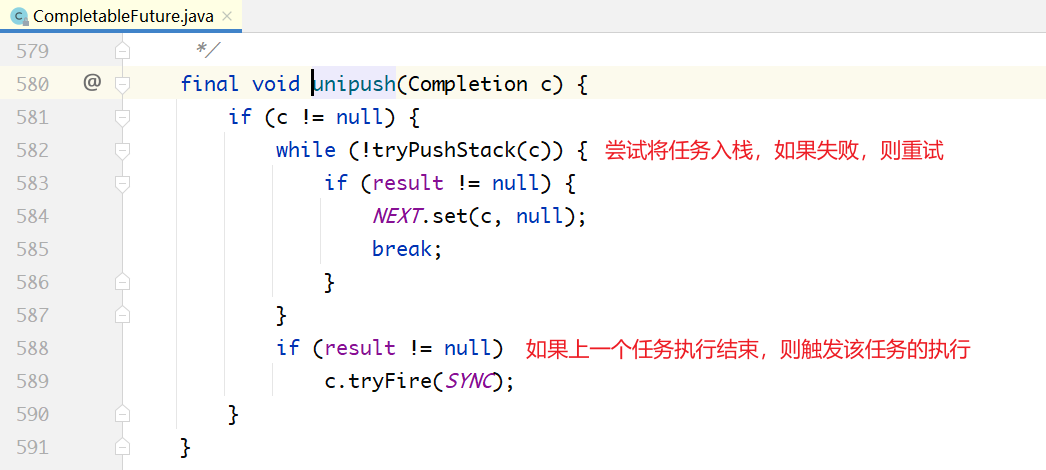
UniApply对象被放入了第1步的CompletableFuture的栈中,在第1步的任务执行完成之后,就会从栈中弹出并执行。如下代码:
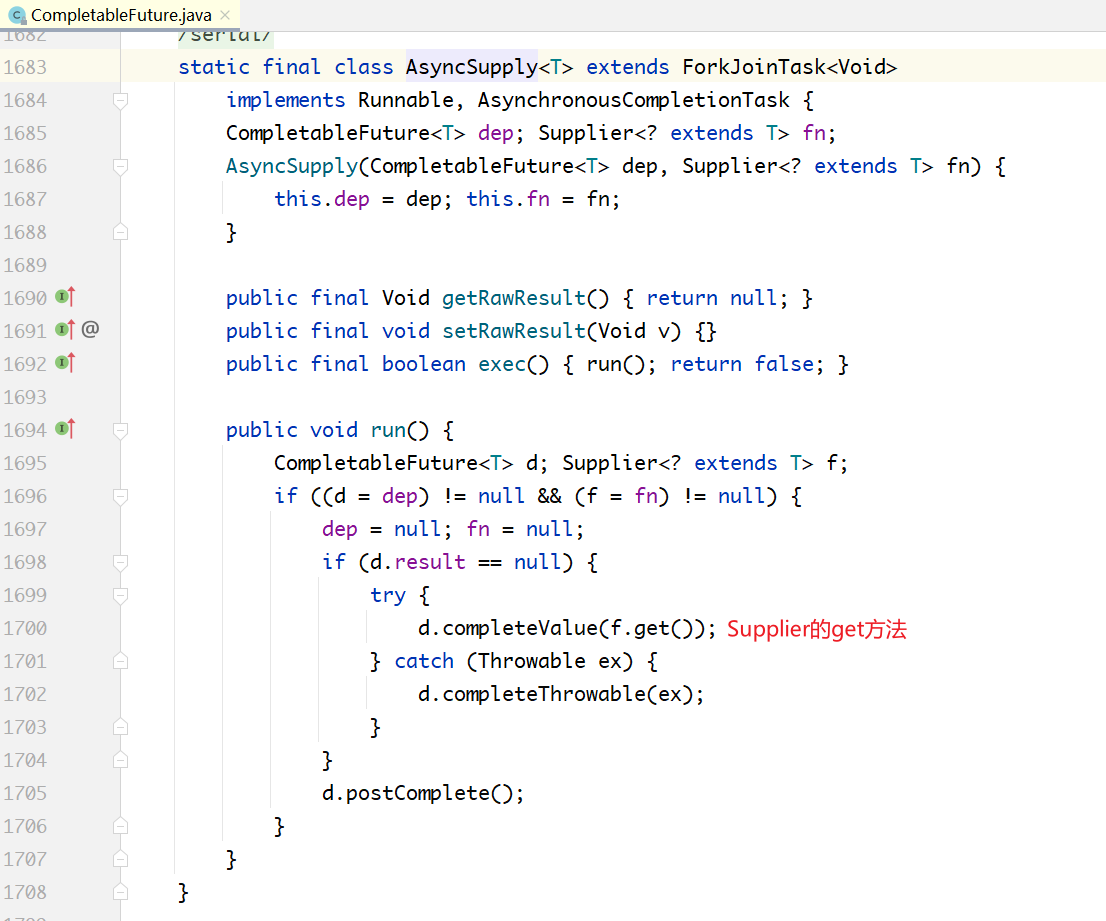
ForkJoinPool执行上面的AsyncSupply对象的run()方法,实质就是执行Supplier的get()方法。执行结果被塞入了 CompletableFuture d 当中,也就是赋值给了 CompletableFuture 内部的Object result变量。
调用d.postComplete(),也正是在这个方法里面,把第2步压入的UniApply对象弹出来执行,代码如下所示。
第3步:CompletableFuture future3=future2.thenRun()
第3步和第2步的过程类似,构建了一个 UniRun 对象,这个对象被压入第2步的
CompletableFuture所在的栈中。第2步的任务,当执行完成时,从自己的栈中弹出UniRun对象并执行。
综上所述:
通过supplyAsync/thenApply/thenRun,分别提交了3个任务,每1个任务都有1个返回值对象,也就是1个CompletableFuture。这3个任务通过2个CompletableFuture完成串联。后1个任务,被放入了前1个任务的CompletableFuture里面,前1个任务在执行完成时,会从自己的栈中,弹出下1个任务执行。如此向后传递,完成任务的链式执行。

# 6.7.4 thenApply与thenApplyAsync的区别
在上面的代码中,我们分析了thenApply,还有一个与之对应的方法是thenApplyAsync。这两个方法调用的是同一个方法,只不过传入的参数不同。
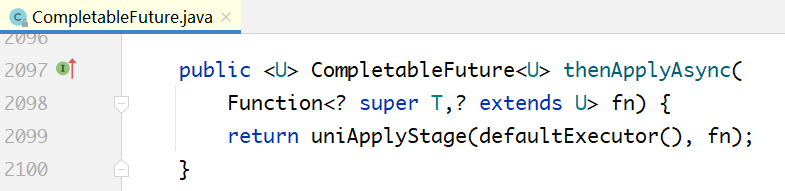
对于上一个任务已经得出结果的情况:

如果e != null表示是thenApplyAsync,需要调用ForkJoinPool的execute方法,该方法:
通过上面的代码可以看到:
- 如果前置任务没有完成,即a.result=null,thenApply和thenApplyAsync都会将当前任务的下一个任务入栈;然后再出栈执行;
- 只有在当前任务已经完成的情况下,thenApply才会立即执行,不会入栈,再出栈,不会交给ForkJoinPool;thenApplyAsync还是将下一个任务封装为ForkJoinTask,入栈,之后出栈再执行。
同理,thenRun与thenRunAsync、thenAccept与thenAcceptAsync的区别与此类似。
# 6.8 任务的网状执行:有向无环图
如果任务只是链式执行,便不需要在每个CompletableFuture里面设1个栈了,用1个指针使所有任务组成链表即可。
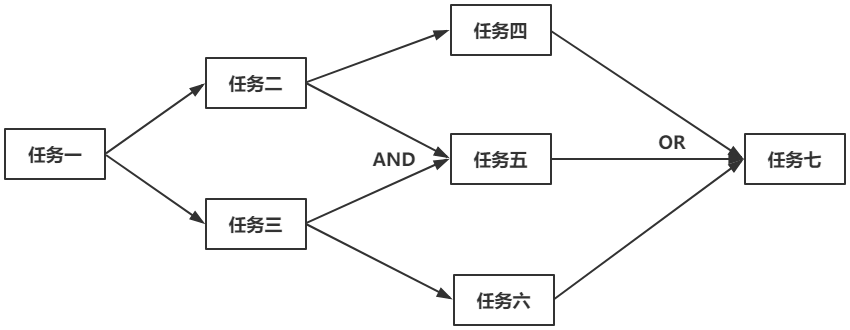
但实际上,任务不只是链式执行,而是网状执行,组成 1 张图。如下图所示,所有任务组成一个有向无环图:
任务一执行完成之后,任务二、任务三可以并行,在代码层面可以写为:
future1.thenApply(任务二),future1.thenApply(任务三);
任务四在任务二执行完成时可开始执行;
任务五要等待任务二、任务三都执行完成,才能开始,这里是AND关系;
任务六在任务三执行完成时可以开始执行;
对于任务七,只要任务四、任务五、任务六中任意一个任务结束,就可以开始执行。
总而言之,任务之间是多对多的关系:1个任务有n个依赖它的后继任务;1个任务也有n个它依赖的前驱任务。
这样一个有向无环图,用什么样的数据结构表达呢?AND和OR的关系又如何表达呢?
有几个关键点:
- 在每个任务的返回值里面,存储了依赖它的接下来要执行的任务。所以在上图中,任务一的
CompletableFuture的栈中存储了任务二、任务三;任务二的CompletableFuutre中存储了任
务四、任务五;任务三的CompletableFuture中存储了任务五、任务六。即每个任务的
CompletableFuture对象的栈里面,其实存储了该节点的出边对应的任务集合。
- 任务二、任务三的CompletableFuture里面,都存储了任务五,那么任务五是不是会被触发两次,执行两次呢?
任务五的确会被触发二次,但它会判断任务二、任务三的结果是不是都完成,如果只完成其中
一个,它就不会执行。
- 任务七存在于任务四、任务五、任务六的CompletableFuture的栈里面,因此会被触发三次。
但它只会执行一次,只要其中1个任务执行完成,就可以执行任务七了。
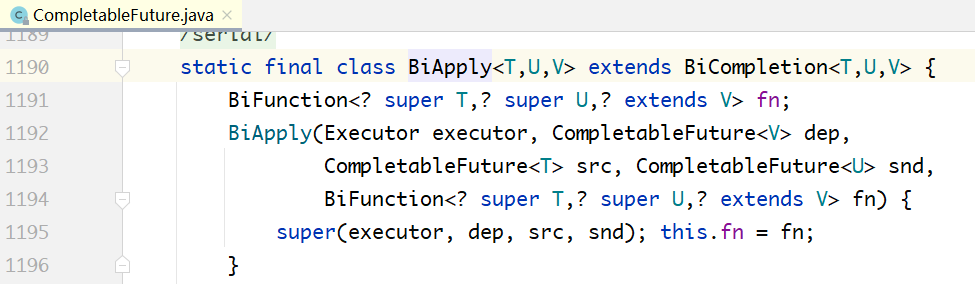
- 正因为有AND和OR两种不同的关系,因此对应BiApply和OrApply两个对象,这两个对象的构造方法几乎一样,只是在内部执行的时候,一个是AND的逻辑,一个是OR的逻辑。

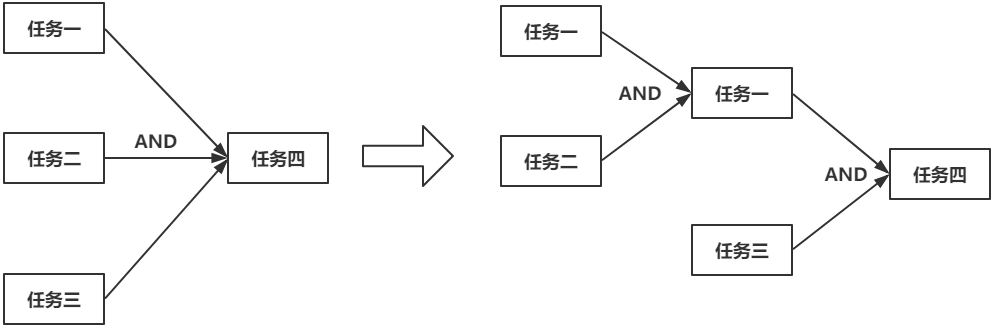
- BiApply和OrApply都是二元操作符,也就是说,只能传入二个被依赖的任务。但上面的任务
七同时依赖于任务四、任务五、任务六,这怎么处理呢?
任何一个多元操作,都能被转换为多个二元操作的叠加。如上图所示,假如任务一AND任务二
AND任务三 ==> 任务四,那么它可以被转换为右边的形式。新建了一个AND任务,这个AND
任务和任务三再作为参数,构造任务四。OR的关系,与此类似。
此时,thenCombine的内部实现原理也就可以解释了。thenCombine用于任务一、任务二执行完成,再执行任务三。
# 6.9 allOf内部的计算图分析
下面以allOf方法为例,看一下有向无环计算图的内部运作过程:

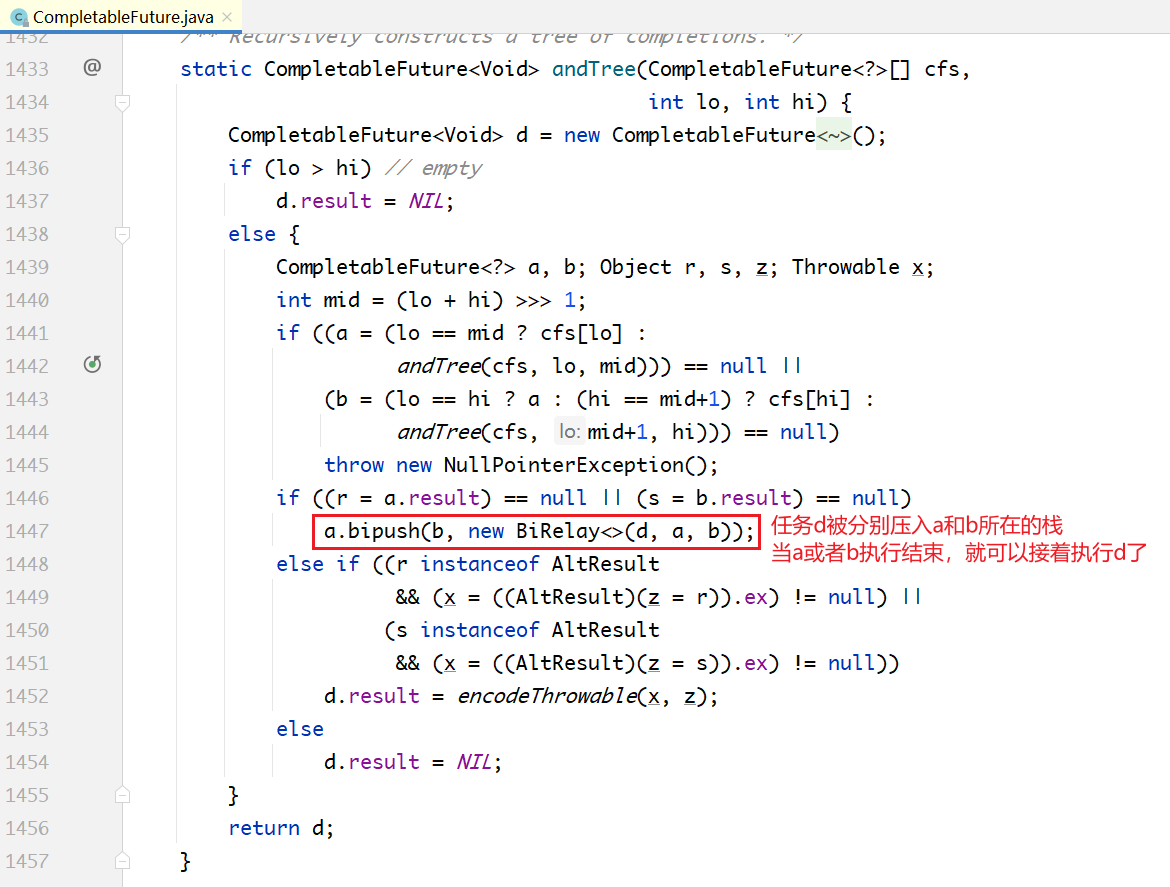
上面的方法是一个递归方法,输入是一个CompletableFuture对象的列表,输出是一个具有AND关系的复合CompletableFuture对象。
最关键的代码如上面加注释部分所示,因为d要等a,b都执行完成之后才能执行,因此d会被分别压入a,b所在的栈中。
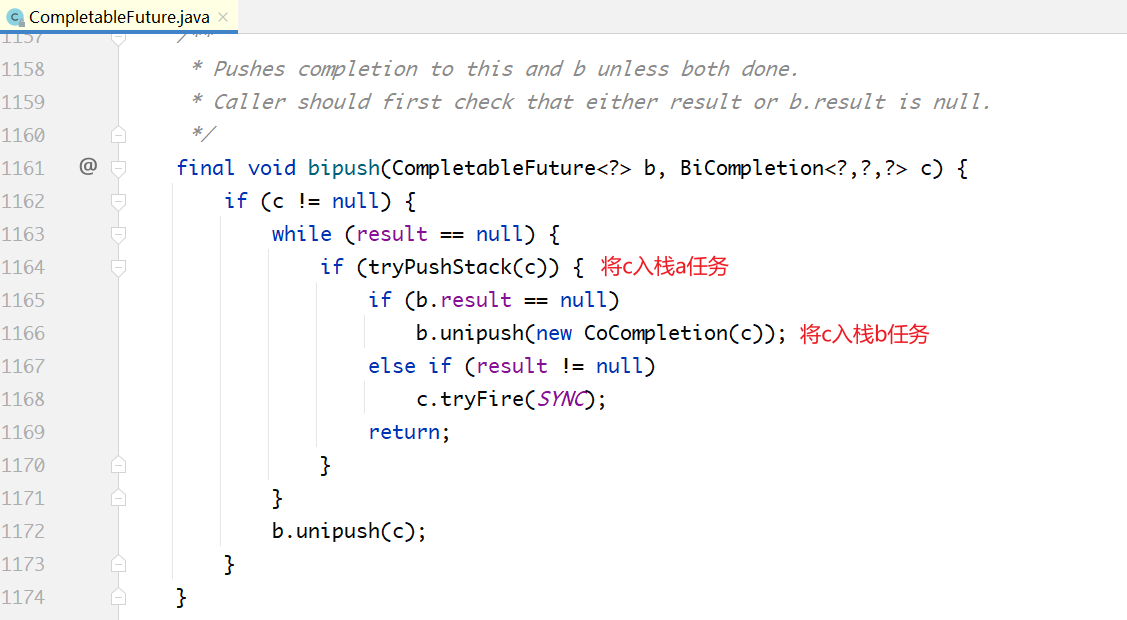
下图为allOf内部的运作过程。假设allof的参数传入了future1、future2、future3、future4,则对应四个原始任务。
生成BiRelay1、BiRelay2任务,分别压入future1/future2、future3/future4的栈中。无论future1或future2完成,都会触发BiRelay1;无论future3或future4完成,都会触发BiRelay2;
生成BiRelay3任务,压入future5/future6的栈中,无论future5或future6完成,都会触发BiRelay3任务。
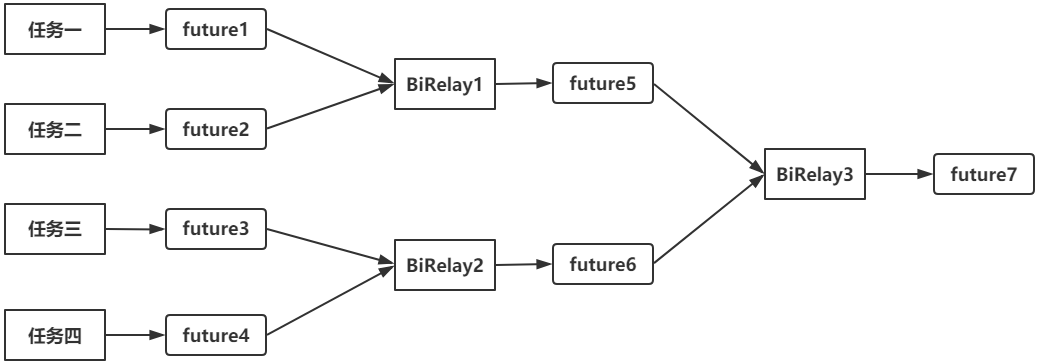
BiRelay只是一个中转任务,它本身没有任务代码,只是参照输入的两个future是否完成。如果完成,就从自己的栈中弹出依赖它的BiRelay任务,然后执行。
